¶ BlackPearl Nearline Media Gateway Cache
The BlackPearl cache is allocated physical storage on either HDDs or SSDs installed in the gateway. The cache functions as a transient location for all data transferred to the BlackPearl gateway from a client, or transferred from tape storage to the BlackPearl gateway. The capacity available for cache is managed by the BlackPearl data planner, where active jobs reserve various amounts of cache capacity known as 'chunks', and chunk size can vary.
When writing data to cache destined for tape storage, or restoring data from tape storage to the BlackPearl gateway, the chunk size is typically 2% of the capacity of a single tape cartridge. If the total job size is less than that amount, the chunk size reduces in size to match the job size.
If desired, you can change the configuration of the BlackPearl gateway cache to allow for better performance, or create a larger or smaller cache suitable for your workflow environment. You can also add new disks installed in the gateway to the system cache.
Note: Changing the system cache should only be done after careful consideration of your desired workflow.
After changing the BlackPearl cache configuration, all data in the cache is deleted, and the system reboots.
Caution: All data currently in the system cache is deleted. As long as all jobs are complete before you change the system cache configuration, no data is lost.
1. Discontinue data transfers to the BlackPearl gateway and ensure that all jobs complete. Migrate any data you want to keep off of the system cache.
2. From the menu bar, select Configuration > Advanced Bucket Management > Storage & Policy Management to display the Advanced Bucket Management screen.
3. In the Storage Pools pane, select the BlackPearl_Cache, and then select Action > Edit. The Change Cache Configuration dialog box displays. Figure 59 The Change Cache Configuration dialog box.
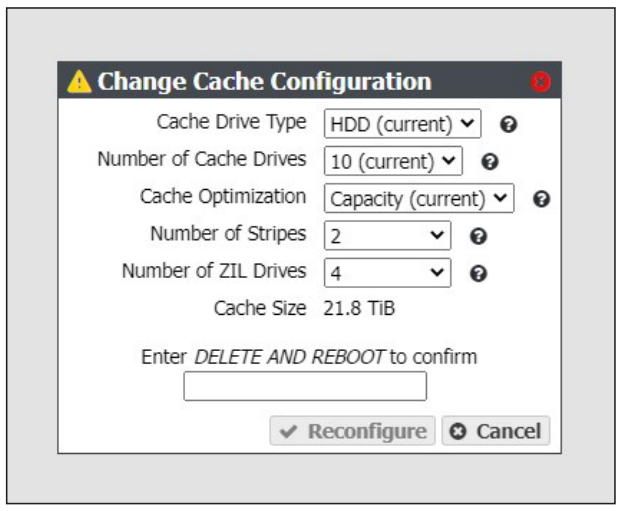
4. If desired, change the Cache Drive Type. You cannot mix drive types in the system cache.
5. If desired, change the Number of Cache Drives. The number of drives selected affects the number of stripes that can be used in Capacity mode.
6. Select the method of Cache Optimization. The default is Performance mode. Use Capacity mode to create a larger cache capable of storing a greater number of objects.
7. If you selected Capacity mode in Step 6, select the Number of Stripes to use for the cache.
8. Select the Number of ZIL Drives (high-performance drives) to assign to the BlackPearl cache.
9. Enter DELETE AND REBOOT in the dialog box, and click Reconfigure.
Caution: All data currently in the system cache is deleted. As long as all jobs are complete before you change the system cache configuration, no data is lost.
10.The BlackPearl gateway creates a new system cache and reboots.