¶ NAS Storage Pools
When creating a new NAS pool, keep the following in mind:
- Each storage pool requires a minimum of one drive. Spectra Logic recommends using eight drives or more in a storage pool to reduce the impact of the overhead. Overhead is the space on the storage pool used to store parity data, and not used for data storage.
- Drives can only be associated with one storage pool. To create a new storage pool using drives that are already configured in an existing storage pool, you must first delete the existing storage pool. You can then create a new storage pool using newly available drives.
- Any drives not configured in storage pools act as global spare drives. If a drive failure occurs, the solution immediately activates a global spare. When the failed drive is replaced it becomes a spare.
- Spectra Logic recommends leaving at least one drive for a global spare
¶ Create Storage Pool
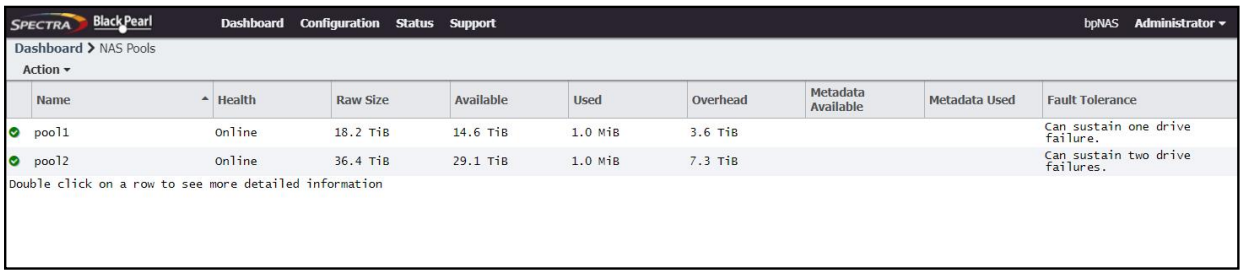
1. From the menu bar, select Configuration > NAS > Pools, or click the Pools pane on the Dashboard. The NAS Pools screen displays.
2. Select Action > New. A dialog box opens to show the default configuration options for the new pool.
Note: The Storage Pool Preview pane does not display until you have selected the disks you want to use in the storage pool
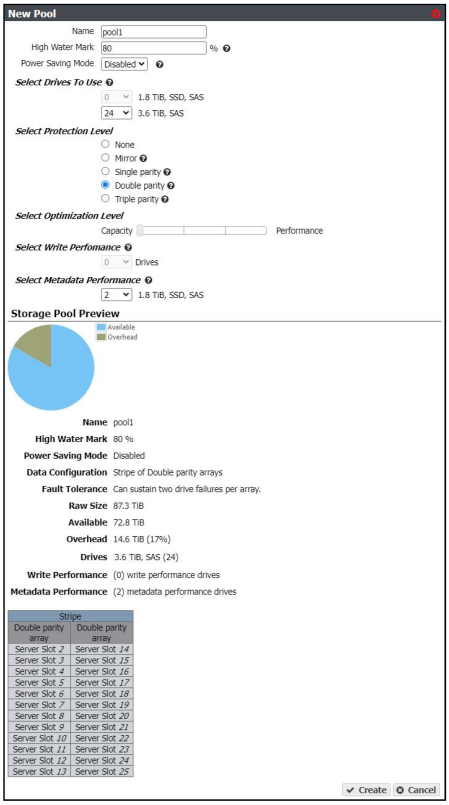
3. Configure the storage pool as required for your environment. As you make changes, the screen updates to show the characteristics of the new pool.
| For This Option: | Do The Following: |
| Name |
Enter a name for the pool. Pool names are limited to 48 characters. Notes:
|
| High Water Mark | Enter a percentage. When the used space on the pool reaches this percentage, an alert is generated. Enter 0 if you do not want to set an alert level. |
| Power Saving Mode |
Using the drop-down menu, select the desired Power Saving Mode. Enabling the power saving mode sets the standby timer to 60 minutes for all drives in the pool, but only if all drives in the pool are capable of using a standby timer. When the disk pool is idle for 60 minutes, the drives spin-down to conserve power. Notes:
|
| Select Drives to Use |
Use the drop-down menu to select the number of drives to include in the pool. If your solution contains more than one type of disk drive, multiple drop-down menus are present, but only one type can be assigned to a pool. Any drive not in a storage pool acts as a global spare. A global spare drive is activated as soon as a drive configured in a storage pool fails. |
| Select Protection Level |
Use the radio buttons to select the protection level for the pool. Only one option can be selected. Use the Storage Pool Preview information to compare the fault tolerance and required overhead for each configuration. None—The pool is not configured to provide data protection. Any drive failure results in data loss. Mirror—Data is striped across two mirrors. Any detected data corruption is corrected using checksums. This type of RAID offers the best performance for small random reads and writes. Single Parity—Data is striped across multiple single-parity arrays, which can tolerate one drive failure without data loss. This type of RAID has faster performance than double- and triple-parity based RAIDs. Double Parity—Data is striped across multiple double-parity arrays, which can tolerate two drive failures without data loss. In most cases, double-parity provides the best balance between data protection, performance, and storage capacity. Triple Parity—Data is striped across multiple triple-parity arrays, which can tolerate three drive failures without data loss. This type of RAID provides the most data protection. |
| Select Optimization Level |
Use the slider to maximize either pool capacity or performance, or to mix the two options. Greater capacity means more storage space but slower performance. Higher performance means the pool is faster at reading or writing data with less overall capacity. Note: The Storage Pool Preview pane of the New Pool screen changes as you move the slider between Capacity and Performance to show the impact your changes have on the storage pool. |
| Select Write Performance | Use the drop-down menu to select the number of drives to use to increase write performance when the pool is shared using NFS. This feature is only intended for storage pools with NFS shares and typically has little impact on CIFS share performance. |
| Select Metadata Performance |
Use the drop-down menu to select the number of drives to use to increase performance when searching metadata, restoring small files, and in deduplication operations. These drives are dedicated to storing metadata information about all objects on the pool and are useful if you search many files before restoring them. Notes:
|
¶ Manage Storage Pools
After creating one or more storage pools, use the instructions in this section to edit, expand, or delete a pool.
You can edit an existing storage pool to change the value of the high water mark and the number of write performance drives. Use the following steps to edit a storage pool.
1. From the menu bar, select Configuration > NAS > Pools, or click the Pools pane on the Dashboard. The NAS Pools screen displays.
2. Select the pool you want to edit and select Action > Edit. The Edit Pool Name dialog box displays.

Note: The Name field is unavailable and cannot be changed.
3. If desired, enter a percentage for the High Water Mark. When the used space on the pool reaches this percentage, an alert is generated. Enter 0 if you do not want to set an alert level.
4. If desired, enable or disable Power Saving Mode for the storage pool. Enabling this feature configures the standby timer to 60 minutes. When there is no I/O to the storage pool for 60 minutes, the drives in the pool spin down and use minimal power.
Note: Spectra Logic recommends leaving power saving mode disabled.
Note: To use this feature, all drives in the storage pool must be power‐saving compatible.
5. If desired, use the Write Performance Drives drop-down menu to select the number of write performance drives to allocate to the storage pool.
6. If desired, use the Metadata Performance Drives drop-down menu to select the number of metatdata performance drives to allocate to the storage pool.
Note: Metadata Performance drives can only be selected in multiples of three.
Note: These drives are permanently part of the storage pool and cannot be removed.
7. Click Save.
You can resize an existing storage pool to include more physical drives present in the solution. This is useful if you just purchased and installed additional drives.
Additionally, expanding a storage pool is used when you want to include different drive types than the type used when creating the pool.
Notes:
- Drive types must be the same block size.
- The number of drives to be added to the storage pool must match the minimum number of drives for the existing stripe size.
- Self-Encrypting Drives (SED) that are unused can be added to a non-encrypted partition.
Important: Contact your solutions architect before including multiple drive types in a storage pool.
Important: Contact your solutions architect before including multiple drive types in a storage pool.
Use the following steps to expand a storage pool.
1. From the menu bar, select Configuration > NAS > Pools, or click the Pools pane on the Dashboard. The NAS Pools screen displays.
2. From the list of existing storage pools, select the storage pool you want to expand, and then select Action > Expand. The Expand Pool screen displays options for adding additional drives to the storage pool.

3. Select the check box next to the type of drive(s) you want to add to the storage pool. By default, the check box for any drive type present in the solution is automatically selected.
4. Use the slider to increase the number of drives to use in the storage pool. As you make changes, the graphics beneath the slider update to show the impact your changes have on the storage pool.
Note: If you are mixing drive types, the number of drives to be added to the storage pool must match the minimum number of drives for the existing stripe size.
5. When you are satisfied with the new configuration, click Save. It may take up to three minutes for pool expansion to complete. Multiple expansions of the same storage pool may increase the time to complete.
Note: If you are adding self-encrypting drives to an encrypted storage pool, the drives are automatically encrypted and then added to the storage pool.
If you want to create a new storage pool and existing storage pools use all of the available drives, you must delete an existing storage pool to make drives available for the new storage pool.
Caution: When you delete a storage pool, all data on it is lost. If you want to keep the data, migrate it to another location before deleting the pool.
Caution: When you delete a storage pool, all data on it is lost. If you want to keep the data, migrate it to another location before deleting the pool.
Use the following steps to delete a storage pool.
1. From the menu bar, select Configuration > NAS > Pools, or click the Pools pane on the Dashboard. The NAS Pools screen displays .
2. From the list of existing storage pools, select the storage pool you want to delete, and then select Action > Delete. A dialog box displays asking you to confirm the deletion.
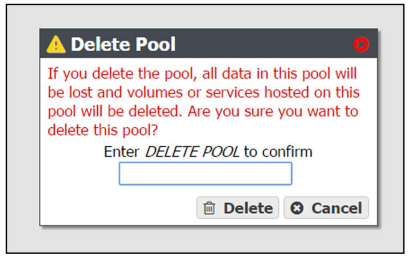
3. Type DELETE in the entry field and click Delete to delete the storage pool. Expanded pools may take up three minutes to delete.
Note: If you deleted an encrypted pool, the drives in the pool are automatically erased and reset.
4. If desired, create a new storage pool that includes the disks no longer in use.