¶ Object Storage Disk
Object Storage Disk uses external SAS expansion nodes to provide both Online Storage Disk and Nearline Storage Disk partitions. The disk partitions are behind the BlackPearl DS3 interface, but can also be accessed using the Spectra StorCycle application, or the Spectra Vail application. Nearline Object Storage disk can also be used as a cache for data stored on tape
¶ Storage Disk Pools Disk
partitions are comprised of disk storage pools on external SAS expansion nodes. There are two types of disk partitions. Online Storage Disk partitions are created on Spectra 44-bay expansion nodes, while Nearline Storage Disk partitions are created on Spectra 96-bay expansion nodes. Both the 77-bay and 107-bay expansion nodes provide either Online Storage Disk or Nearline Storage Disk partitions, depending on the type of drives installed.
- Online Storage Disk — Is used as a temporary, high-performance storage target for highly transactional data.
- Nearline Storage Disk — Is a cost effective storage target for deep storage. Nearline storage is not recommended for frequent reads or writes.
Disk storage pools are manually created using the BlackPearl user interface after you attach an expansion node.
Once storage pools are created, you must manually add them to disk partitions.
¶ Manage Nearline and Online Disk Pools
Use the instructions in this section to manage nearline and online disk pools. For information on managing network attached storage (NAS) disk pools, see Managing Storage Pools.
Data present on storage pools on expansion nodes can be moved from one BlackPearl gateway to another, either to increase name space redundancy, or as part of disaster prevention. Use the instructions in this section to import a pool.
1. Ensure the expansion node containing the pool you want to import is cabled to the BlackPearl gateway master node.
2. Ensure the settings for the DS3 service Default Conflict Resolution Mode are set to your preference.
3. From the menu bar, select Configuration > Advanced Bucket Management > Storage & Policy Management to display the Advanced Bucket Management screen.
4. Disk pools eligible for import display with a health of Foreign. Select the nearline pool you want to import in the Storage Pools pane, and select Action > Import Pool. The Import dialog box displays.
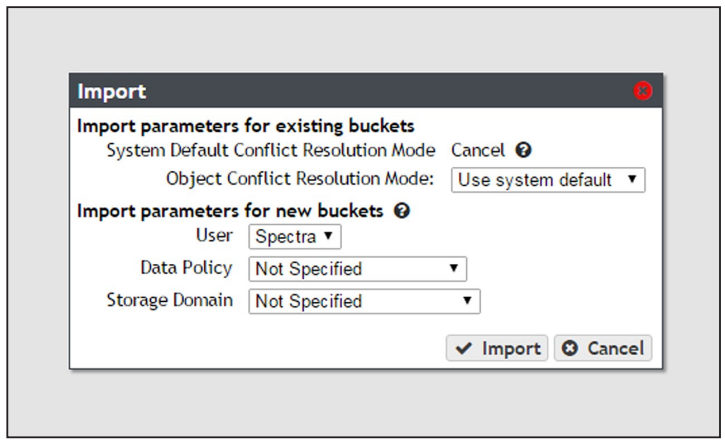
5. Configure the import parameters for existing buckets present on the storage pool.
a. The System Default Conflict Resolution Mode is configured when editing the DS3 service and is not editable in this dialog box. See Configure the DS3 Service for more information.
b. Using the drop-down menu, select a behavior for Object Conflict Resolution Mode. This setting configures how the gateway handles a file name conflict when importing foreign objects on the storage pool to an existing bucket.
| Value | Description |
| Use system default | The gateway uses the behavior displayed in the System Default Conflict Resolution Mode row of the Import dialog box. |
| Cancel | Abort the import process if a file name conflict is discovered. |
| Accept Most Recent | Keep the file with the most recent creation date. |
| Accept Existing | Keep the file currently in the BlackPearl database. |
6. Configure the import parameters for new buckets present on the storage pool.
a. Using the drop-down menu, select the User to be the owner of the imported bucket (s).
b. Using the drop-down menu, select the Data Policy to use for the imported bucket (s).
c. Using the drop-down menu, select the Storage Domain to use for the imported bucket(s).
7. Click Import.
If you want to delete an online or nearline disk pool (for example, to create a larger pool after adding additional disks to the gateway) use the instructions in this section to delete a disk pool.
Note: You must delete all objects contained in the disk pool before you can delete the pool.
1. From the menu bar, select Configuration > Advanced Bucket Management > Storage & Policy Management to display the Advanced Bucket Management screen.
2. Select the pool you want to delete in the Storage Pools pane, and select Action > Delete. A confirmation dialog box displays.
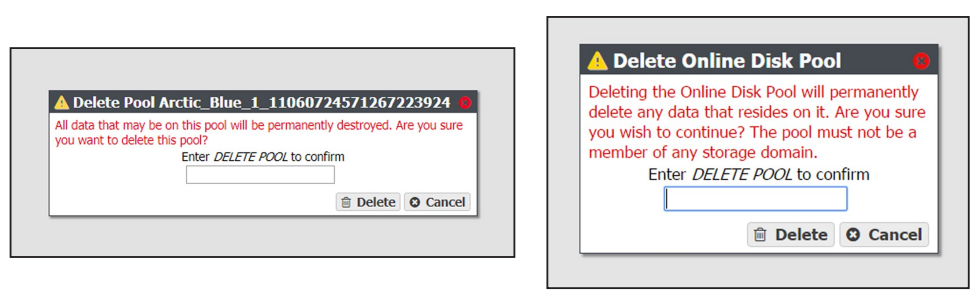
3. Enter DELETE POOL into the entry field and click Delete. The disk pool is deleted.