¶ Storage Domains
A storage domain is a named collection of member data partitions and, when applicable, media type combinations. Storage domains define the possible places where the BlackPearl Nearline Gateway stores data that is sent to it. Data persistence rules and data policies further define where and for how long to store specific data.
Entire data partition/media type combinations are members of storage domains. When a bucket requires additional capacity, a single disk partition or tape is allocated out of the members to fulfill the capacity requirement.
¶ Create Storage Domain
A storage domain is a named collection of member data partitions and, when applicable, media type combinations. Storage domains define the possible places where the BlackPearl Nearline Gateway stores data that is sent to it. Data persistence rules and data policies further define where and for how long to store specific data. Entire data partition/media type combinations are members of storage domains. When a bucket requires additional capacity, a single disk partition or tape is allocated out of the members to fulfill the capacity requirement.
Use the instructions in this section to create a new storage domain.
1. From the menu bar, select Configuration > Advanced Bucket Management > Storage & Data Policy Management to display the Advanced Bucket Management screen.
2. Select Action > New Storage Domain. The New Storage Domain dialog box displays.
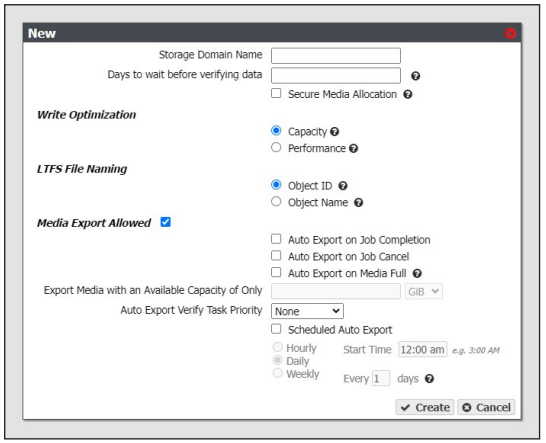
3. Enter a name for the storage domain in the Storage Domain Name field.
4. Enter a value for Days to wait before verifying data. The gateway automatically performs a data integrity verification for all tape media in the storage domain that are unchanged after the specified number of days pass, to ensure the data written to the tape cartridge is still viable. If null, data integrity verification is not performed automatically.
Notes:
- By default, all data on the tape is verified. You can customize the amount of data to be verified in Configure the DS3 Service.
- When this verification completes, the Last Verified field on the tape details screen is updated.
- While the verification is in progress, client access has priority over the data integrity verification.
- You can also initiate data integrity verification for tape media manually. See Data Integrity Verification - Tape Media for more information.
- Disk pools are not subject to automatic data integrity verification. However, you can initiate data integrity verification for disk pools manually.
5. Select or clear Secure Media Allocation. If enabled, Secure Media Allocation ensures that media allocated to the storage domain always remains in the storage domain. Even if all data on the media is deleted, the media will not be reallocated to another storage domain.
Note: Secure Media Allocation should only be enabled when, for compliance purposes, the user must be certain which media ever contained any data for the storage domain (usually, to physically destroy the media once the data is no longer needed), or to force rotating through media when new backups are created and old backups are deleted.
6. Select the Write Optimization for the storage domain. This setting specifies whether job chunks are written as quickly as possible or across as few pieces of media as possible.
- The BlackPearl gateway writes to tape drives based on chunks, with default chunk size of approximately 128 GB, or 2% of the tape media capacity. When there is a queue of jobs, the BlackPearl gateway aggregates smaller jobs or smaller chunks into a size of approximately 128 GB for each tape drive read or write task.
- When running in Capacity mode, the BlackPearl gateway uses as few tape cartridges or disk pools as possible. The gateway only allocates a new tape cartridge or disk pool when capacity is needed.
- When running in Performance mode, the BlackPearl gateway spreads the chunks or aggregations across all available tape drives, or disk pools. The number of tape drives used can be limited by using tape drive reservations.
- The consequence of using performance mode with tape media is that during a restore or GET job, more tape drives and tapes cartridges are required to restore a data set that was initially spread across many tapes. This can drastically reduce overall performance during restores, as the gateway takes longer to get access to the full data set.
Important: Spectra Logic highly recommends working with Spectra Logic Technical Support, or Spectra Professional Services before using Performance mode.
Note: If the storage domain is assigned to a data policy and "Minimize Spanning" is enabled for the data policy, it overrides the capacity mode and performance mode logic for a given job, up to 1 TB in size. Minimize spanning increases the chunk size to 1 TB, and always keeps one chunk on a single tape regardless of write mode. If the job is larger than 1 TB, then multiple chunks are used and the gateway uses the logic for capacity mode vs performance mode, where different chunks may transfer to different tapes.
7. Select the LTFS File Name option for the storage domain.
Note: This setting only applies to tape media. If the storage domain includes tape partition(s), you must specify the LTFS File Name option for the storage domain. This option specifies how the gateway names the file when it writes them to tape.
There are two options for the LTFS File Name:
- Object Name — LTFS file names use the format {bucket name}/{object name}, for example bucket1/video1.mov. Object names must comply with LTFS file naming rules. If the tapes are exported from the BlackPearl gateway and loaded into a non-BlackPearl tape partition, the file names match the object names.
Important: If you select Object Name, you cannot assign this storage domain to a data policy that uses versioning.
Notes:
- The colon character (:) is not allowed in LTFS file names and therefore not allowed in BlackPearl object names.
- The slash character (/) is not allowed in LTFS file names; however, the BlackPearl software can accommodate a slash in the object name and translates it as a directory in the LTFS file system (e.g. directory1/directory2/video1.mov).
- File names with multiple consecutive slash characters (//) are not allowed.
- Directory names have a limit of 255 characters.
- File names have a variable character limit. If you are using English ASCII characters, the limit is 1024 characters. If you are using a graphical language, such as Japanese, the limit is 512 characters
Spectra Logic does not recommend the following characters in LTFS file names or BlackPearl object names for reasons of cross-platform compatibility:
- Asterisk (*)
- Question mark (?)
- Question mark (?)
- Forward slash (/)
- Backslash (\)
- Vertical bar / pipe (|)
- Left curly brace ({)
- Right curly brace (})
- Caret (^)
- Percent character (%)
- Grave accent / back tick (`)
- Right square bracket (])
- Left square bracket ([)
- Double quotation marks (")
- Greater Than symbol (>)
- Less Than symbol (<)
- Tilde (~)
- Pound character (#)
- Control characters such as carriage return (CR) and line feed (LF)
- Non-printable ASCII characters (128–255 decimal characters)
Spectra Logic does not recommend accented characters in LTFS file names or BlackPearl object names because LTFS normalizes them before objects are written to tape and there could be conflicts with two objects having the same normalized name.
- Object ID — LTFS file names use the format {bucket name}/{object id}, for example bucket1/1fc6f09c-dd72-41ea-8043-0491ab8a6d82. Object names do not need to comply with LTFS file naming rules. The gateway saves object names as LTFS extended attributes allowing any third party application to reconstruct all the data including the object names.
Important: If this storage domain is assigned to a data policy that uses versioning, after data is persisted, you cannot change this setting from Object ID to Object Name.
8. Optionally, select the Media Export Allowed check box to enable tape media export options for the storage domain. Clear the check box to disallow tape media export for the storage domain. This setting only applies to tape media. See Tape Export Best Practices on page 24 for more information.
When a tape cartridge export occurs, a message displays in the BlackPearl user interface, and is also emailed to the system administrator. The system administrator must be configured to receive emails with both Informational and Warning message severity to be notified when tape media is exported. This allows the administrator to retrieve the tape media when it is exported. Do not leave tape media in the library Entry/Exit port for long periods of time.
Notes:
- By configuring email alerts, the user is also notified when a GET job is requesting an object from exported tape media, so it can be imported into the library to complete the GET job.
- It is important to not export tape media from the library directly. The BlackPearl Nearline gateway controls the movement of media in the library.
If you select to allow media export, configure the following options:
a. Select or clear options for auto media export.
- Auto Export on Job Completion — select this option to have the gateway automatically export tape(s) when a job completes. This option is helpful if you plan to write a single job to tape and want to retrieve the media shortly after the job completes for secure archival or transfer of data to another tape library or BlackPearl Nearline gateway.
- Auto Export on Job Cancel — select this option to have the gateway automatically export tape(s) when a user cancels a job. This option is helpful if you do not want append the next job to a partially filled tape.
- Auto Export on Media Full — select this option to have the gateway automatically export tape(s) when a tape is full. This option is helpful to maximize the amount of data stored on tape media.
Note: If you select for media to automatically export when the media is full, you can optionally configure the Export Media with an Available Capacity of Only setting, which determines when the gateway marks a piece of media as full, and queues the piece of media for export. Select the desired unit size from the drop‐down menu and enter a numerical value for the media full threshold in the text box to the left of the unit size drop‐down menu.
b. Using the Auto Export Verify Task Priority drop-down menu, select a task priority for tapes to be verified when they are automatically exported. Selecting None means that the gateway does not verify tapes before exporting them.
c. Select or clear the Scheduled Auto Export check box. If enabled, this option automatically exports all tape media on a set schedule. This option is helpful if you need to move all tape media to off-site archival physical storage on a set schedule, regardless of the capacity of storage remaining on the tape cartridges. Use the instructions below to configure either hourly, daily, or weekly, automatic tape export.
Note: Scheduled Auto Export operates independently from the condition-based auto export options discussed in Step a on page 77.
For example, if you select to have tape media auto export when full, the gateway exports a tape cartridge when it meets the media full threshold. Additionally, when the scheduled auto export time is met, the gateway exports all tape cartridges, regardless of whether they have reached the media full threshold.
i. Select Hourly as the interval for the tape export schedule
ii. Enter numbers for Every _ hours on minute _. These values specify the interval in hours between tape exports and the number of minutes after the top of the hour when the export starts. For example, if the values are set to 4 and 15, tapes are exported every four hours at 15 minutes after the hour. The maximum setting for the hours field is 48, where tapes are exported every two days.
Note: Spectra Logic recommends offsetting the minutes after the hour for starting tape exports so that there are not a large number of jobs starting at exactly the same time.
i. Select Daily as the interval for the tape export schedule.
ii. Enter a time value for Start Time, and include AM or PM after the value. This field is not case sensitive.
iii. Enter a number for Every _ days. Allowed values are between 1 and 31. This value specifies the interval, in days, between scheduled exports. The value entered is enumerated from the first day of the month. The schedule resets at the beginning of each month. For example, if this value is set to 2, scheduled tape exports occur every two days, starting with the 1st of the month, at the time specified in Step ii. A value of 30 runs on the 1st of the month, and then again on the 31st of the month (for months that have 31 days). To schedule exports on the first of every month, set the interval to 31 days.
i. Select Weekly as the interval for the tape export schedule (see Figure 14 on page 73).
ii. Enter a time value for Start Time, and include AM or PM after the value. This field is not case sensitive.
iii. Select one or more days for Every week on:. This determines the day(s) of each week the gateway exports tapes.
Once a storage domain is created, you must add storage domain members. Entire data partition/media type combinations are members of storage domains. When a bucket requires additional capacity, a single disk partition or tape cartridge is allocated out of the members to fulfill the capacity requirement.
Use the instructions in this section to add a storage domain member to a storage domain.
1. From the menu bar, select Configuration > Advanced Bucket Management > Storage & Data Policy Management to display the Advanced Bucket Management screen.
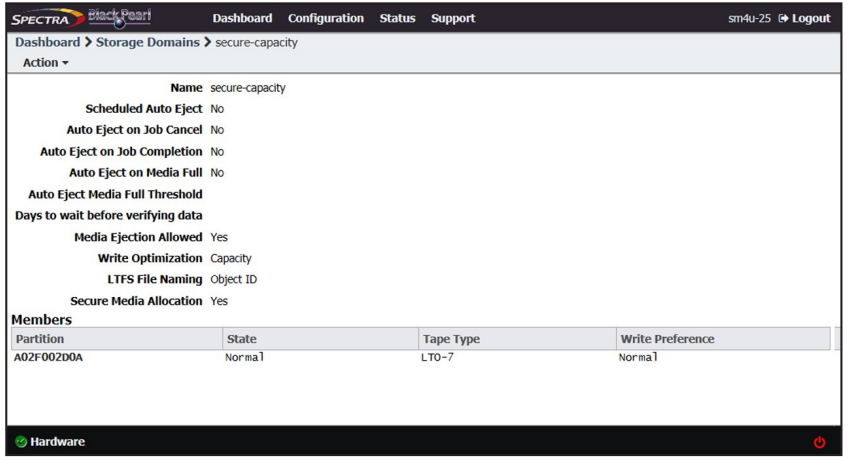
2. Double-click the storage domain for which you want to add a new storage domain member in the Storage Domains pane, or select the storage domain and select Action > Show Details from the menu bar. The Storage Domain details screen displays.
3. Select Action > New Storage Domain Member. The New Storage Domain Member dialog box displays.
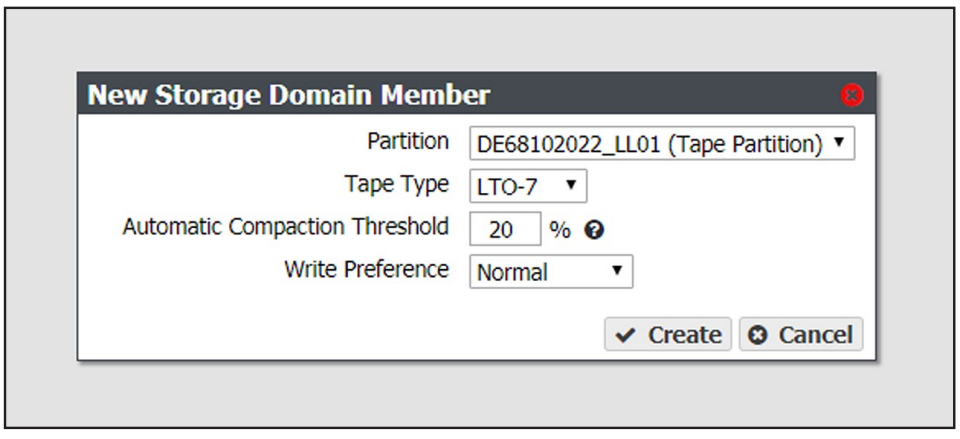
4. Use the Partition Name drop-down menu to select a tape or disk partition from the list of previously created partitions.
Note: You cannot add a disk partition to a storage domain that already uses a tape partition, and you cannot add a tape partition to a storage domain that already uses a disk partition.
5. Use the Tape Type drop-down menu to select the media type for a tape partition.
Notes:
- You must select the media type that matches the media present in the tape library partition. If the partition contains multiple generations of media, select the highest version.
- This option does not display if you selected a disk partition in Step 4
6. Enter a percentage for the Automatic Compaction Threshold. Automatic compaction occurs when the percentage of deleted objects on a tape cartridge exceeds this value. The default percentage is 95.
Note: If you selected a disk partition in Step 4, this setting is unavailable.
7. Use the Write Preference drop-down menu to select the write preference for this member of the storage domain. This setting determines the preferred usage of the partition when additional capacity is needed. The gateway uses a partition with High write preference before a partition with Normal write preference, and so on. Use Never Select to indicate that a partition is read-only.
8. Click Create. The new storage domain member displays on the Storage Domain details screen.
¶ Manage a Storage Domain
Use the instructions in this section to edit or delete a storage domain member or a storage domain.
Use the instructions in this section to change the write preference for a storage domain member.
Note: For every storage domain, at least one storage domain member must have a write preference other than Never_Select.
1. From the menu bar, select Configuration > Advanced Bucket Management > Storage & Data Policy Management to display the Advanced Bucket Management screen.
2. Double-click the row for the storage domain with the storage domain member that you want to edit, or select the storage domain row and then select Action > Show Details. The Storage Domain details screen displays.
3. Select the storage domain member row and then select Action > Edit Storage Domain Member.
Note: Do not click the partition name when selecting the data persistence rule row or the Partition details screen will open.
The Edit Storage Domain Member dialog box displays.
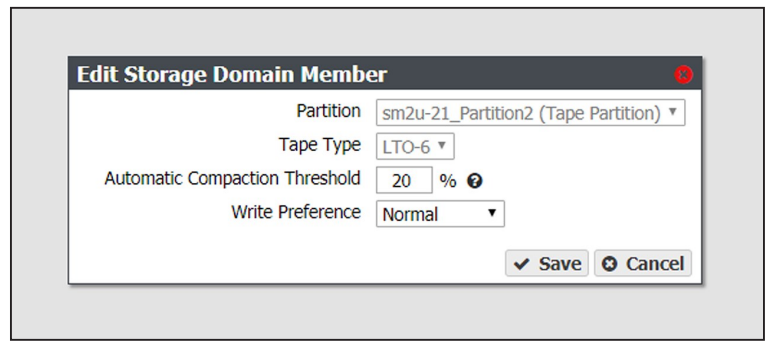
4. If desired, edit the percentage for the Automatic Compaction Threshold. Automatic compaction occurs when the percentage of deleted objects on a tape cartridge exceeds this value.
5. If desired, using the drop down menu, edit the Write Preference field as necessary.
Note: When editing a storage domain member, the Partition and Tape Type settings are unavailable.
6. Click Save. The edited storage domain member displays on the Storage Domain details screen.
Use the instructions in this section to exclude a storage domain member. This command migrates data off of the selected storage domain member before deleting the storage domain member
1. From the menu bar, select Configuration > Advanced Bucket Management > Storage & Data Policy Management to display the Advanced Bucket Management screen.
2. Double-click the row for the storage domain with the storage domain member that you want to exclude, or select the storage domain row and then select Action > Show Details. The Storage Domain details screen displays.
3. Select the desired storage domain member row and then select Action > Exclude Storage Domain Member.
Note: Do not click the partition name when selecting the data persistence rule row or the Partition details screen will open. The Exclude Storage Domain Member dialog box displays.
4. Type EXCLUDE in the entry field and then click Exclude.
1. From the menu bar, select Configuration > Advanced Bucket Management > Storage & Data Policy Management to display the Advanced Bucket Management screen.
2. Double-click the row for the storage domain with the storage domain member that is currently being excluded, or select the storage domain row and then select Action > Show Details. The Storage Domain details screen displays.
3. Select the desired storage domain member row and then select Action > Cancel Storage Domain Member Exclusion.
Note: Do not click the partition name when selecting the data persistence rule row or the Partition details screen will open.
The Cancel Storage Domain Member Exclusion dialog box displays
4. Type CANCEL in the entry field and then click Cancel.
Use the instructions in this section to delete a storage domain.
Notes:
- You cannot delete a storage domain member that has a tape or pool assigned to the storage domain.
- You cannot delete the last storage domain member of a storage domain assigned to a data policy.
1. From the menu bar, select Configuration > Advanced Bucket Management > Storage & Data Policy Management to display the Advanced Bucket Management screen.
2. Double-click the row for the storage domain with the storage domain member that you want to edit, or select the storage domain row and then select Action > Show Details. The Storage Domain details screen displays.
3. Select the storage domain member row and then select Action > Delete Storage Domain Member
Note: Do not click the partition name when selecting the data persistence rule row or the Partition details screen will open.
A confirmation dialog box displays.
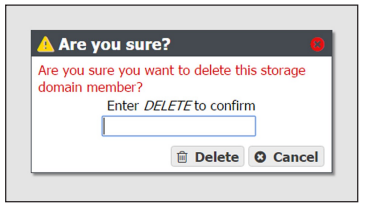
4. Type DELETE into the entry field, and then click Delete.
Use the instructions in this section to change the parameters for a storage domain
Important: If this storage domain is assigned to a data policy that uses versioning, after data is persisted, you cannot change this setting from Object ID to Object Name
Note: If an edit you select is not allowed, the gateway generates an error message when you click Save, explaining why the edit is not allowed.
- From the menu bar, select Configuration > Advanced Bucket Management > Storage & Data Policy Management to display the Advanced Bucket Management screen.
- Select the row for the storage domain that you want to edit and then select Action > Edit. The Edit storage domain screen displays .
Note: Alternatively, select Action > Edit Storage Domain from the storage domain details screen.
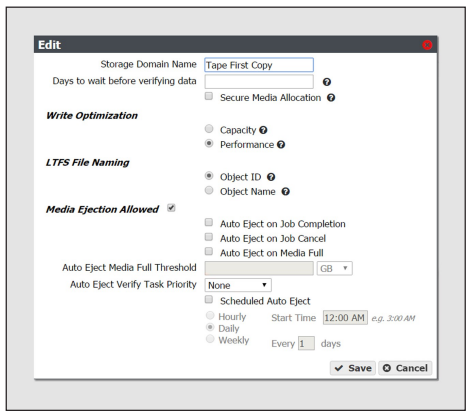
3. Edit the fields as necessary.
4. Click Save. The edited storage domain displays on the Advanced Bucket Management screen.
Use the instructions in this section to delete a storage domain.
Note: You cannot delete a storage domain if it is used by a data policy. See Delete a Data Replication Rule on page 113 for instructions on removing the storage domain from a data policy.
1. From the menu bar, select Configuration > Advanced Bucket Management > Storage & Data Policy Management to display the Advanced Bucket Management screen.
2. Select the row for the storage domain that you want to delete and then select Action > Delete. A confirmation dialog box displays.
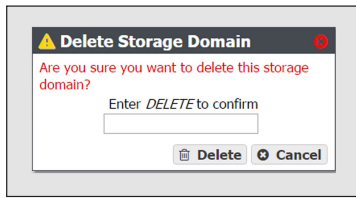
3. Type DELETE into the entry field, and then click Delete.