¶ Tape and Tape Drive Management
¶ Tape Media
A tape export strategy must be considered as part of a data policy. For information about the default data policies and options available to customize data policies, see Understanding Advanced Bucket Management on page 88. For additional information about exporting and importing tapes, see Working with Tape Libraries and Media on page 341.
Spectra recommends keeping at least one copy of all archived data in the library at all times. Spectra Logic tape libraries can be easily upgraded by purchasing more slot licenses, or, if the slots become completely full, upgrading the library itself to one with more slots using the exclusive Spectra TranScale technology. A tape library user or administrator may decide to export media cartridges from a tape library for any of the reasons described below:
- Exporting a copy for off-site disaster recovery: The BlackPearl gateway allows a user to make multiple copies of data automatically. A typical use case is to create a “tape first copy” that is intended to be left in the library for easy retrieval as well as an “export copy” intended to be removed from the library once full for archival at an alternate site for safety.
- See Understanding Advanced Bucket Management on page 88 for information on setting up multiple copies and exporting a copy, and the Tape Library User Guide for details on the physical process of exporting and importing tapes into the library.
- Exporting a copy of data for transfer to another location: In some work flows, a user exports a tape or an entire bucket to transfer the data to another facility. Individual tapes or entire buckets can be exported manually using the BlackPearl user interface (see Export Tapes on page 393).
- Exporting tapes to free up space in the library: Some work flows and budgets, require older or unused media to be exported, making it not readily available. Individual tapes or entire buckets can be exported manually using the BlackPearl user interface (see Export Tapes on page 393). "Export" has multiple definitions within the gateway: • From the BlackPearl gateway’s perspective, export means that a tape has been marked as exported in the BlackPearl database and an instruction has been given to the tape library to move the tape for export from the library.
Note: You cannot export a tape that is currently in use. • From a tape library perspective, export indicates the physical process of exporting tapes from the library.
¶ Tape Drives
Below is information for managing and testing Tape Drives which are connected to a BlackPearl Nearline System.
If you suspect a tape drive is bad, use the steps in this section to test the tape drive.
Note: Starting with BlackPearl OS 5.6, you can test a tape drive using the BlackPearl user interface. Only use the process below if you cannot use the BlackPearl user interface to test a tape drive.
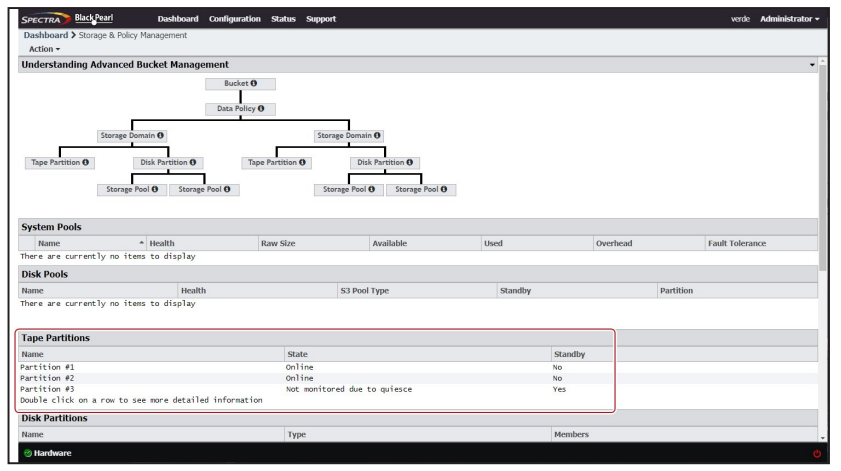
1. In the BlackPearl management interface, select Configuration > Advanced Bucket Management > Storage & Policy Management.
2. Under the Tape Partitions heading, double-click the partition containing the drive you want to test.
3. Select the row of the drive, select Action > Offline Tape Drive, then click Deactivate.
4. Select Action > Reserve Tape Drive.
5. Using the Reserved Task Type drop-down menu, select Maintenance and then click Save. Once all jobs using the tape cartridge in the drive complete, the library ejects from the drive, and moves it to storage.
6. Using the tape library BlueScale user interface, edit the tape partition to remove the drive you want to test. See your tape library User Guide for instructions.
Note: Continue to see your tape library User Guide for the remainder of the test process.
7. Create a new partition with the drive to test as the only drive in the partition.
8. Import a scratch tape and a cleaning cartridge into the Entry/Exit port of the new partition.
9. Test the drive using the tape library MLM Drive Test feature.
10.After the drive test completes, delete the partition you created in Step 7.
- If the drive passed the drive test, edit the tape partition used by the BlackPearl Nearline gateway to include the drive. In the BlackPearl management interface tape partition details screen, select the drive you tested and select Online Tape Drive.
- If the drive test failed, collect drive diagnostic logs as described in Collect Drive Diagnostic Logs on the next page and contact Spectra Logic Technical Support (see Contacting Spectra Logic on page 9).
If desired, or at the direction of Spectra Logic Technical Support, use the instructions in this section to generate drive diagnostic logs (also referred to as drive dumps). The process takes approximately 30 seconds.
1. Select Configuration > Advanced Bucket Management > Storage & Policy Management.
2. Under the Tape Partitions banner, double-click the partition containing the drive for which you want to save logs.
3. Select the drive, and select Action > Collect Tape Drive Diagnostic Logs.
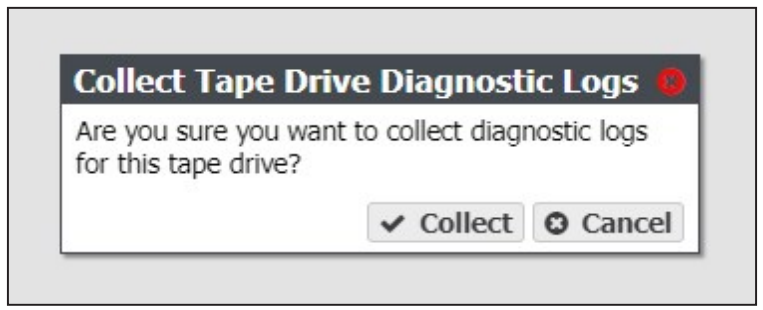
4. Click Collect. The process takes approximately 30 seconds. After the drive log collection completes, download the log.
Use the steps below to confirm your BlackPearl system is correctly configured to write data to tape media.
1. In the BlackPearl management interface, select Configuration > Database Backup.
2. On the Database Backup screen, select Action > Start Immediate Backup.
3. Click Backup to start the database backup process. Once the database backup is generated, the file is pushed to the BlackPearl cache.
4. On the Dashboard screen, in the Jobs pane, wait until a new job displays using the BlackPearl database backup bucket.
5. Once the job begins writing to cache, select Status > Amazon compatible S3 Jobs. 6. On the Jobs screen, select Action > Active Jobs.
7. Monitor the database backup job and wait until the job no longer displays on the active job screen.
8. Select Action > Canceled Jobs and confirm the database backup job is in the list of canceled jobs.
9. Select Configuration > Buckets, then double-click the database backup bucket. 10.Select the database file created for the test and select Action > Show Physical Placement. The tape(s) used to store the backup file display.