¶ BlackPearl Data Replication
BlackPearl Data replication will require the conifguraiton of a Replication Target and Replication Rules
¶ Create Replication Target
Replication targets allow you to configure the BlackPearl gateway to automatically replicate data to another BlackPearl gateway, or to the Azure or Amazon S3 clouds.
Note: The instructions below describe configuring a target that is later associated with a data policy. For instructions on creating NAS replication, see Configure the NAS Replication Service.
Configuring a BlackPearl target allows a data policy on one BlackPearl gateway to replicate data to a second gateway. If data is sent to a data policy that is not configured for replication, the data is not replicated to the target gateway.
With replication enabled, as soon as data is PUT to the cache of the source gateway it begins replicating to the target gateway. Storing multiple copies of the same data on different BlackPearl gateways provides enhanced data security and disaster recovery if the source gateway fails. When you delete data from the source gateway, you can optionally specify to have the data deleted from the target gateway as well.
Important: Spectra Logic recommends using the same versioning settings on both the source and target BlackPearl gateways.
Note: If the source BlackPearl gateway uses object versioning but the target BlackPearl gateway does not, when an object is deleted on the source gateway, the delete is replicated to the target gateway. However, when IOM validates the data on the two gateways, it detects that the object still exists on the source gateway, and self-heals the object on the target gateway again.
Use the instructions in this section to configure a BlackPearl target.
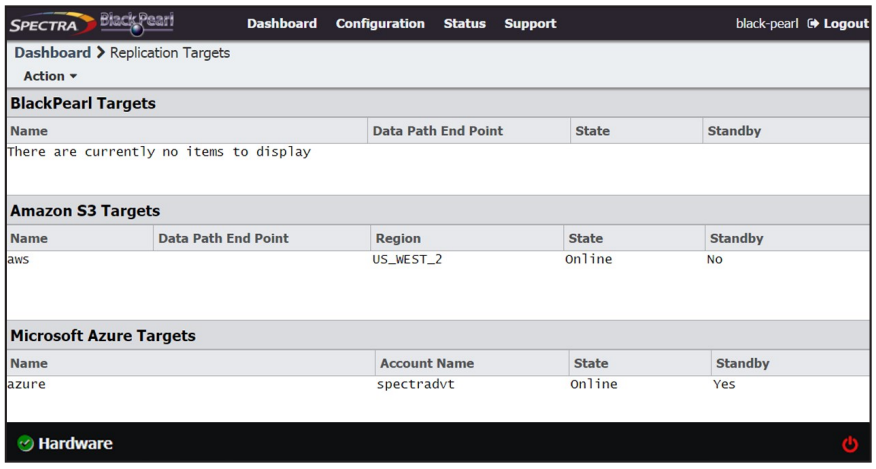
1. From the menu bar, select Configuration > Advanced Bucket Management > Replication Targets to display the Replication Targets screen.
2. Select Action > New BlackPearl Target. The New BlackPearl Target dialog box displays.

3. Enter a name for the BlackPearl target in the Name field.
4. Enter the system name of the target gateway, or the IP address of the target gateway’s data port, as the Data Path End Point.
Note: Do not use the IP address of the target gateway’s management port.
5. Using the drop-down menu, select a value for the Data Path Port. Set this to the value of the port on which the target gateway’s Amazon compatible S3 service is running.
Note: Port selections for secure transfer (443/8443) are grayed-out and not able to be selected until you select Data Path HTTPS in Step 8 below.
6. Enter the username or S3 Access ID of a user with administrator privileges on the target gateway in the Administrator Username or Amazon S3 Access ID field.
Note: Administrator credentials are used to configure and maintain the source/target relationship. They are not used for user driven replication operations.
7. In the AWS Administrator S3 Secret Key field, enter the AWS S3 Secret Key of the user you entered in Step 6.
8. Select Data Path HTTPS to enable secure data transfer with the BlackPearl target. When this option is selected, the Data Path Port setting automatically changes to 443. Repeat Step 5 if you want to change the data path port to 8443.
Important: Using HTTPS for data transfer greatly impacts data transfer speed. Spectra Logic recommends leaving this disabled if it is not required for your data storage environment.
9. If you enabled Data Path HTTPS, you can optionally select Data Path Verify Certificate to verify the SSL certificate of the BlackPearl target. This option is not available if you did not enable Data Path HTTPS.
Note: Do not enable this option if the BlackPearl target uses the default self-signed SSL certificate.
10. Using the drop-down menu, select a value for the Default Read Preference. Data is normally read from the source gateway whenever possible. This setting determines from what location data is read back from the target gateway, if needed.
| Name | Description |
| Last Resort | The source gateway only reads data from the target gateway if the source gateway cannot read from any of its own data partitions. |
| Minimum Latency |
The source gateway reads the data from the data partition with the least latency no matter whether it is connected to the source gateway or the target gateway. For example, if the source gateway only has the data on tape and the target gateway has the data on pool, the data is read from the target pool. Note: Only use MINIMUM LATENCY when the network between the source and target is very inexpensive. |
| After Online Pool | The source gateway only reads data from the target gateway if the source gateway cannot read from an online pool. |
| After Nearline Pool | l The source gateway only reads data from the target gateway if the source gateway cannot read from a nearline pool. |
| After Non-Exportable Pool | The source gateway only reads data from the target gateway if the source gateway cannot read from secure media. |
| Never | Data is never read from the target gateway. |
11. Using the drop-down menu, select a value for Access Control Replication
| Name | Description |
| None |
No access control information is replicated to the BlackPearl target. Note: The Administrator secret key on both the source and target BlackPearl gateways must be identical when setting Access Control Replication to None. |
| Users | User creation, modification, and deletion is replicated to the BlackPearl target. |
12. If you selected Users in Step 11, you can optionally enter the name of a data policy previously configured on the target gateway to use as the Replicated User Default Data Policy. If configured, the gateway uses this target data policy as the default data policy for any users replicated to the target.
13. Optionally, enter the IP address of the Data Path Proxy Server. If configured, the source gateway uses the specified proxy to connect to the target gateway.
14. Click Create. The new BlackPearl target appears on the Advanced Bucket Management screen.
Configuring an Amazon S3 target allows a data policy on the BlackPearl gateway to replicate data to the Amazon S3 cloud. With replication enabled, as soon as data is PUT to the cache of the source gateway it begins replication to the Amazon S3 cloud.
Note: Only Amazon Web Services (AWS) S3 is qualified as an Amazon S3 target. Other Amazon compatible S3 services have not been tested.
Restrictions
The following restrictions apply to creating an Amazon S3 target:
- You cannot create two Amazon S3 targets using the same Data Path End Point and Access Key.
- You cannot create two Amazon S3 targets using the same Region and Access Key when the Data Path End Point has no value.
- You cannot link multiple Amazon S3 targets to the same Data Policy when both targets have no value for the Data Path End Point, and the prefix and suffix are the same for both targets.
Use the instructions in this section to configure an Amazon S3 target.
1. From the menu bar, select Configuration > Advanced Bucket Management > Replication Targets to display the Replication Targets screen.
2. Select Action > New Amazon S3 Target. The New Amazon S3 Target dialog box displays.
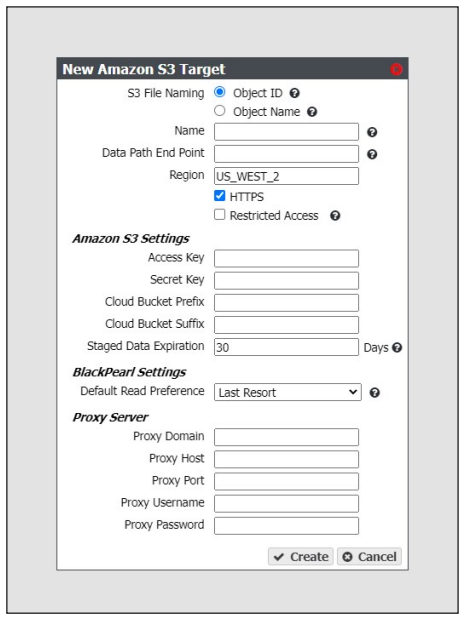
3. Select the type of S3 File Naming to use for the target.
- Object ID - objects display a UUID when viewed on the Amazon target.
- Object Name - objects display their name when viewed on the Amazon target.
4. Enter a name for the Amazon S3 target in the Name field.
5. Enter a Data Path End Point (system name or IP address) or a Region to identify the remote Amazon S3 target.
|
Acceptable regions are: Note: Dashes (-) in the standard AWS S3 region code must be replaced by underscores (_) in the text entered in the Region field. |
||
|
|
|
Notes:
- If you enter both a Data Path End Point and a Region, the gateway uses the Data Path End Point and ignores the Region.
- You cannot use the same Data Path End Point or Region for multiple Amazon S3 targets.
6. By default, HTTPS is selected so that the replication uses a secure connection. If desired, clear HTTPS to use HTTP.
7. If desired, select Restricted Access to limit access to a specific set of credentials and buckets set in your Amazon S3 account. This setting removes the verification the BlackPearl gateway uses to confirm valid credentials when a data path endpoint and region are entered in Step 5.
Note: Spectra Logic recommends against using Restricted Access.
8. Enter the S3 Access Key of a user with administrator privileges for the Amazon S3 account in the Access Key field.
Note: Administrator credentials are used to configure and maintain the source/target relationship. They are not used for user driven replication operations.
9. In the Secret Key field, enter the S3 Secret Key of the user you entered in Step 8.
10. Optionally, enter a Cloud Bucket Prefix and/or Cloud Bucket Suffix. Bucket names on the BlackPearl gateway must be unique within the gateway, but bucket names in AWS S3 must be unique across the world. To permit friendlier, shorter local bucket names on the BlackPearl gateway while avoiding naming conflicts with AWS S3, the gateway adds the defined Cloud Bucket Prefix and Cloud Bucket Suffix to the BlackPearl bucket name when it replicates the bucket. For example, if Cloud Bucket Prefix=prefix, Cloud Bucket Suffix=suffix, and the bucket name=name, the resulting name of the bucket on the Amazon S3 target is prefix-name-suffix.
Note: The prefix and/or suffix must adhere to the replication target naming requirements
11. Enter a Staged Data Expiration time in days using any value between 1 and 365. The default is 30. When data is pre-staged by the S3 service so that the BlackPearl gateway can retrieve the data in an S3-standard manner, you must specify an expiration period in days. This is the minimum number of days before the pre-staged copy expires. If the gateway does not retrieve all of the data before the copy expires, it has to pre-stage the data again, incurring additional delays and costs.
Note: Spectra Logic strongly discourages configuring a Staged Data Expiration of less than 7 days as any potential cost savings are offset by the possibility of multiple stagings.
12. Using the drop-down menu, select a value for the Default Read Preference. Data is normally read from the source gateway whenever possible. This setting determines when data is read back from the Amazon S3 target, if needed.
Note: Spectra Logic recommends that Default Read Preference be kept at the default of
| Name | Description |
| Last Resort | The source gateway only reads data from the target if the source gateway cannot read from any of its own data partitions. |
| Minimum Latency | The source gateway reads the data from the data partition with the least latency no matter whether it is connected to the source gateway or the target. |
| After Online Pool | l The source gateway only reads data from the target if the source gateway cannot read from an online pool. |
| After Nearline Pool | The source gateway only reads data from the target if the source gateway cannot read from a nearline pool. |
| After Non-Exportable Tape | The source gateway only reads data from the target gateway if the source gateway cannot read from secure media. |
| Never | Data is never read from the target. |
13.Optionally, enter the information for a proxy server:
| Field | Description |
| Proxy Domain | Domain name for the proxy server. |
| Proxy Host | The host name or IP address for the proxy server through which the gateway connects. |
| Proxy Port | The proxy server port through which the gateway connects. |
| Proxy Username | The username used when connecting through the proxy server. |
| Proxy Password | The password used when connecting through the proxy server. |
14.Click Create. The new Amazon S3 target appears on the Replication Targets screen.
Configuring a Microsoft Azure target allows a data policy on the BlackPearl gateway to replicate data to the Microsoft Azure cloud. With replication enabled, as soon as data is PUT to the cache of the source gateway it begins replication to the Microsoft Azure cloud.
Use the instructions in this section to configure a Microsoft Azure target.
1. From the menu bar, select Configuration > Advanced Bucket Management > Replication Targets to display the Replication Targets screen.
2. Select Action > New Microsoft Azure Target. The New Microsoft Azure Target dialog box displays
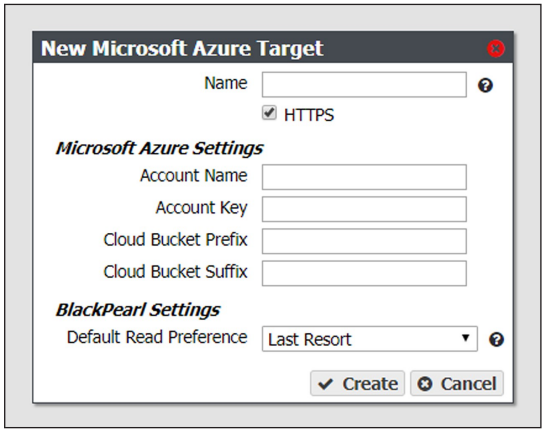
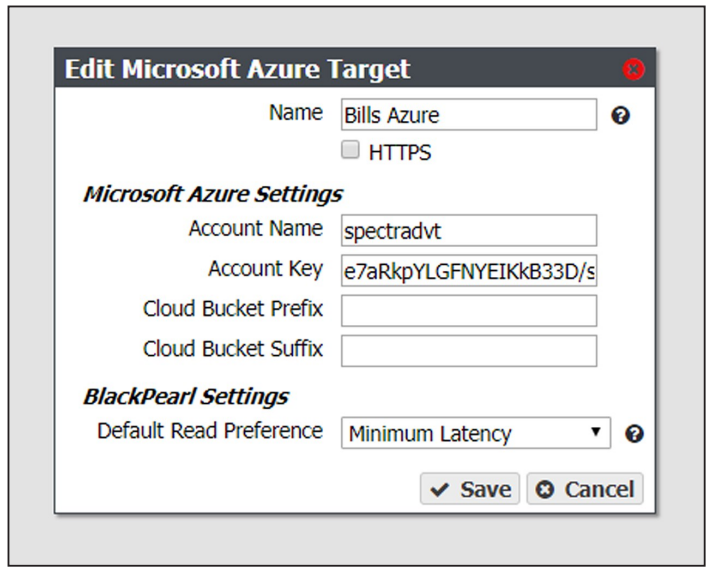
3. Enter a name for the Microsoft Azure target in the Name field.
4. By default, HTTPS is selected so that the replication uses a secure connection. If desired, clear the HTTPS check box to use HTTP.
5. Enter the account name for the Microsoft Azure account in the in the Account Name field.
Note: You can not use the same Account Name for multiple Microsoft Azure targets.
6. In the Account Key field, enter the account key associated with the account entered in Step 5.
7. Optionally, enter a Cloud Bucket Prefix and/or Cloud Bucket Suffix. Bucket names on the BlackPearl gateway must be unique within the gateway, but bucket names in Microsoft Azure must be unique across the world. To permit friendlier, shorter local bucket names on the BlackPearl gateway while avoiding naming conflicts with Microsoft Azure, the gateway adds the defined Cloud Bucket Prefix and Cloud Bucket Suffix to the BlackPearl bucket name when it replicates the bucket. For example, if Cloud Bucket Prefix=prefix, Cloud Bucket Suffix=suffix, and the bucket name=name, the resulting name of the bucket on the Azure target is prefix-name-suffix.
Note: The prefix and/or suffix must adhere to the replication target naming requirements.
8. Using the drop-down menu, select a value for the Default Read Preference. Data is normally read from the source gateway whenever possible. This setting determines when data is read back from the Microsoft Azure target, if needed.
Note: Spectra Logic recommends that Default Read Preference be kept at the default of Last Resort.
| Name | Description |
| Last Resort | The source gateway only reads data from the target if the source gateway cannot read from any of its own data partitions. |
| Minimum Latency | The source gateway reads the data from the data partition with the least latency no matter whether it is connected to the source gateway or the target. |
| After Online Pool | The source gateway only reads data from the target if the source gateway cannot read from an online pool. |
| After Nearline Pool | The source gateway only reads data from the target if the source gateway cannot read from a nearline pool. |
| After Non-Exportable Tape | The source gateway only reads data from the target gateway if the source gateway cannot read from secure media. |
| Never | Data is never read from the target. |
9. Click Create. The new Microsoft Azure target appears on the Replication Targets screen.
¶ Manage Replication Targets
Use the instruction in this section to manage existing replication targets.
1. From the menu bar, select Configuration > Advanced Bucket Management > Replication Targets to display the Replication Targets screen.
2. Double-click the BlackPearl replication target that you want to edit, or select the replication target and then select Action > Edit. The Edit BlackPearl Target dialog box displays.

3. Edit the fields as necessary.
4. Click Save. The edited BlackPearl replication target displays on the Replication Targets screen.
Use the instructions in this section to modify the configuration of an existing Amazon replication target.
1. From the menu bar, select Configuration > Advanced Bucket Management > Replication Targets to display the Replication Targets screen.
2. Double-click the Amazon replication target that you want to edit, or select the replication target and then select Action > Edit. The Edit Amazon S3 Target dialog box displays.
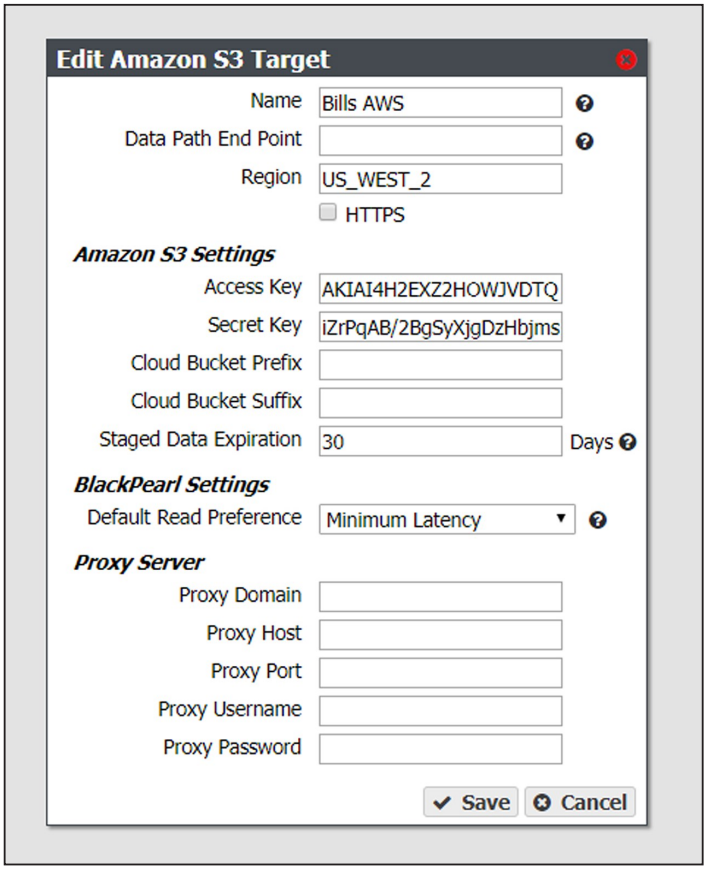
3. Edit the fields as necessary.
4. Click Save. The edited Amazon replication target displays on the Replication Targets screen.
Use the instructions in this section to modify the configuration of an existing Azure replication target.
1. From the menu bar, select Configuration > Advanced Bucket Management > Replication Targets to display the Replication Targets screen.
2. Double-click the Azure replication target that you want to edit, or select the replication target and then select Action > Edit. The Edit Microsoft Azure Target dialog box displays.
3. Edit the fields as necessary.
4. Click Save. The edited Azure replication target displays on the Replication Targets screen.
Use the instructions in this section to verify connectivity to the target and optionally verify replicated data on the replication target.
1. From the menu bar, select Configuration > Advanced Bucket Management > Replication Targets to display the Replication Targets screen.
2. Double-click the replication target for which you want to verify connectivity, or select the replication target and then select Action > Verify Data. The Verify target type Target dialog box displays.
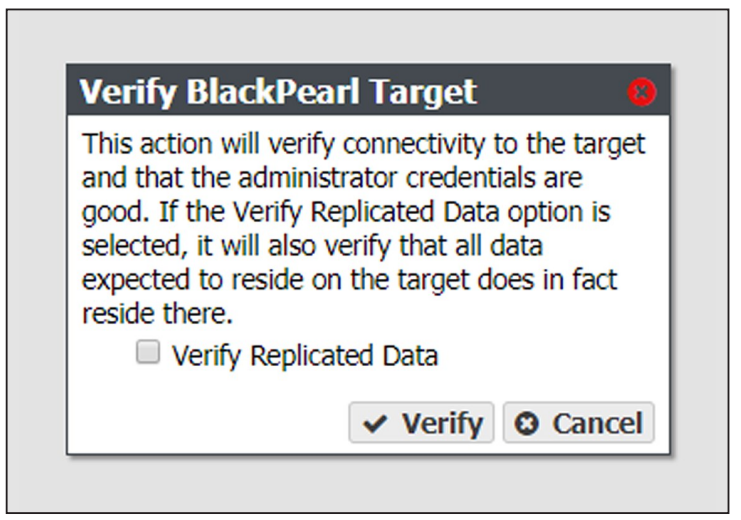
3. If desired, select Verify Replicated Data to confirm that the expected data resides on the replication target.
Note: Depending on the amount of data on the replication target, this process may take a long time to complete.
4. Click Verify. The gateway confirms connectivity to the target and optionally verifies the replicated data.
If you need to perform service on a replication target, it is recommended that you first put the replication target into a standby state. Otherwise, the BlackPearl gateway may attempt to use the target while it is in service.
Use the instructions in this section to place a replication target into a standby state. No data is transferred to the replication target while in standby.
1. From the menu bar, select Configuration > Advanced Bucket Management > Replication Targets to display the Replication Targets screen.
2. Select the replication target that you want to put into standby and then select Action > Put Target in Standby. The Put Target in Standby dialog box displays.

3. Click Deactivate. The target is now in standby.
Use the instructions in this section to activate a replication target currently in standby. Once activated, data transfers are allowed to the replication target.
1. From the menu bar, select Configuration > Advanced Bucket Management > Replication Targets to display the Replication Targets screen.
2. Select the replication target that you want to activate and then select Action > Activate Target. The Activate Target dialog box displays.

3. Click Activate. The target is now in an active state.
Use the instructions to delete an existing replication target.
Caution: If you delete a replication target, all data on the target is deleted.
Note: You cannot delete a replication target if it is used by a data policy.
1. From the menu bar, select Configuration > Advanced Bucket Management > Replication Targets to display the Replication Targets screen.
2. Select the replication target that you want to delete and then select Action > Delete. The Delete target type Target dialog box displays.
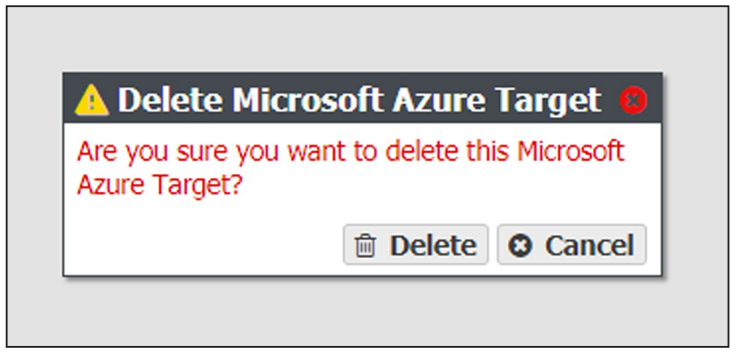
3. Click Delete to delete the selected replication target.
¶ Manage Data Replication Rules
Use the instructions in this section to change the type, data policy, or whether to replicate deletes, for a BlackPearl data replication rule.
Note: Some edits are restricted based on whether a bucket is currently using the data policy. If an edit is not allowed, an error message displays when you click Save.
1. From the menu bar, select Configuration > Advanced Bucket Management > Storage & Data Policy Management to display the Advanced Bucket Management screen.
2. Double-click the data policy with the BlackPearl data replication rule that you want to edit, or select the data policy and then select Action > Show Details. The Data Policy details screen displays.
3. Double-click the row of the BlackPearl data replication rule that you want to edit, or select the row for the replication rule and then select Action > Edit Rule.
Note: Do not click the target name when selecting the data persistence rule row or the Replication Targets screen will open.
The Edit BlackPearl Data Replication Rule dialog box displays.

4. The BlackPearl target name is unavailable and cannot be changed.
5. Edit the fields as necessary.
6. Click Save. The edited BlackPearl data replication rule displays on the Data Policy details screen.
Use the instructions in this section to change the type, Initial Data Placement, whether to Replicate Deletes, or the Max Blob Size for an Amazon S3 data replication rule.
Note: Some edits are restricted based on whether a bucket is currently using the data policy. If an edit is not allowed, an error message displays when you click Save.
1. From the menu bar, select Configuration > Advanced Bucket Management > Storage & Data Policy Management to display the Advanced Bucket Management screen.
2. Double-click the data policy with the Amazon S3 replication rule that you want to edit, or select the data policy and then select Action > Show Details. The Data Policy details screen displays.
3. Double-click the row of the Amazon S3 data replication rule that you want to edit, or select the row for the replication rule and then select Action > Edit Rule.
Note: Do not click the target name when selecting the data persistence rule row or the Replication Targets screen will open.
The Edit Amazon S3 Data Replication Rule dialog box displays.

4. The Amazon S3 target name is unavailable and cannot be changed.
5. Edit the fields as necessary.
Note: If you are configuring the replication to target a bucket that was previously created using the Amazon AWS interface, you must define a Lifecycle Management Rule in AWS to migrate data from the bucket default tier to the preferred tier, if necessary. Spectra Logic recommends using an immediate (0 days) move rule.
6. Click Save. The edited Amazon S3 data replication rule displays on the Data Policy details screen.
Use the instructions in this section to change the type, whether to Replicate Deletes, or the Max Blob Size for a Microsoft Azure data replication rule.
Note: Some edits are restricted based on whether a bucket is currently using the data policy. If an edit is not allowed, an error message displays when you click Save.
1. From the menu bar, select Configuration > Advanced Bucket Management > Storage & Data Policy Management to display the Advanced Bucket Management screen,
2. Double-click the data policy with the Microsoft Azure replication rule that you want to edit, or select the data policy and then select Action > Show Details. The Data Policy details screen displays.
3. Double-click the row of the Microsoft Azure data replication rule that you want to edit, or select the row for the replication rule and then select Action > Edit Rule.
Note: Do not click the target name when selecting the data persistence rule row or the Replication Targets screen will open.
The Edit Microsoft Azure Data Replication Rule dialog box displays.

4. The Microsoft Azure target name is unavailable and cannot be changed.
5. Edit the fields as necessary
6. Click Save. The edited Microsoft Azure data replication rule displays on the Data Policy details screen.
Use the instructions in this section to delete a data replication rule for any type of target from a data policy.
Note: You cannot delete a data replication rule if the data policy is used by a bucket.
1. From the menu bar, select Configuration > Advanced Bucket Management > Storage & Data Policy Management to display the Advanced Bucket Management screen.
2. Double-click the data policy with the replication rule that you want to delete, or select the data policy and then select Action > Show Details. The Data Policy details screen displays.
3. Select the row for the replication rule and then select Action > Delete Rule.
Note: Do not click the target name when selecting the data persistence rule row or the Replication Targets screen will open.
A confirmation dialog box displays.
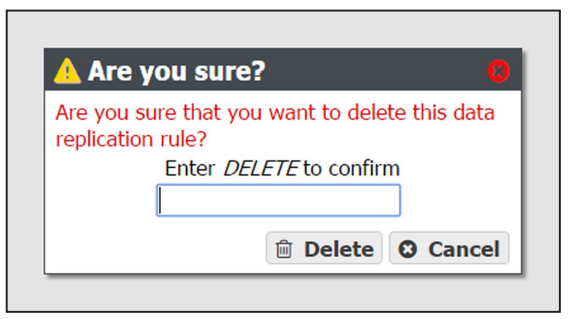
4. Type DELETE into the entry field, and then click Delete.