¶ Additional Configuration Options
This section describes using the BlackPearl user interface to configure additional options for the Spectra BlackPearl NAS Solution.
Contents:
Configure Active Directory ServicesSNMP Service
Multi-Factor Authentication
Configure Vail Sphere
Configure and Use Encryption
Configure Certificates
Remote Logging
Manually Enter Activation Keys
¶ Configure Active Directory Services
Use the following instructions to configure networking services on the BlackPearl NAS solution.
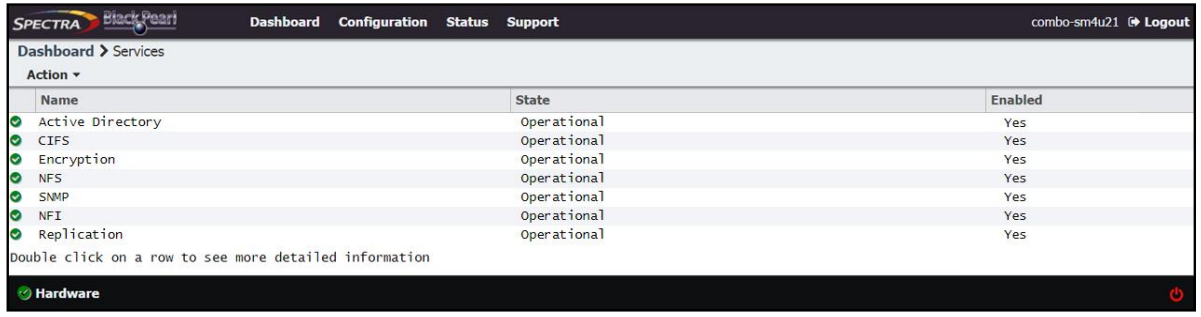
To display the services screen, from the menu bar, select Configuration > Services.
The Active Directory service in the BlackPearl user interface is used to connect the solution to a Windows Active Directory domain. Before you can join a domain, you must configure the BlackPearl NAS solution to use NTP.
Note: If the BlackPearl NAS solution time and the Active Directory domain time are more than 5 minutes apart, joining the domain fails.
Use the instructions in this section to join or leave an Active Directory domain.
1. From the menu bar, select Configuration > Services. The Services screen displays
2. Double-click the Active Directory row, or select the Active Directory row and select Action > Show Details. The Active Directory details screen displays.
3. On the Active Directory service details screen, select Action > Join Domain. The Join Domain dialog box displays.
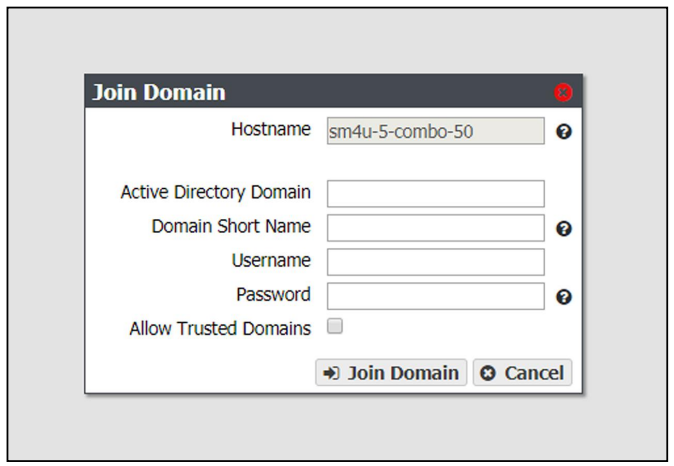
4. The Hostname identifies the BlackPearl NAS solution in the Active Directory domain
Note: The hostname is unavailable and cannot be changed in the Join Domain dialog box. Use the Hardware screen to change the hostname if desired
5. Enter the name of the Active Directory Domain you want to join.
6. Optionally, enter the Domain Short Name if your domain uses a non-standard workgroup name.
7. Enter the Username and Password for a user authorized to join the specified domain.
Notes:
- The BlackPearl NAS solution uses “Pre‐Windows 2000” login names for Active Directory users. Login names greater than 20 characters in length, or containing special characters (for example ‘@’) are not able to log into the BlackPearl user interface.
- You must enter the user name and password each time the BlackPearl NAS solution joins an Active Directory domain. The solution does not save this information.
8. If desired, select Allow Trusted Domains if the Active Directory domain you want to join is a trusted domain.
9. Click Join Domain.
If desired, you can edit your Active Directory configuration to enable or disable support for trusted domains.
1. From the menu bar, select Configuration > Services. The Services screen displays.
2. Double-click the Active Directory row, or select the Active Directory row and select Action > Show Details. The Active Directory details screen displays.
3. Select Action > Edit. The Edit AD Service dialog box displays.
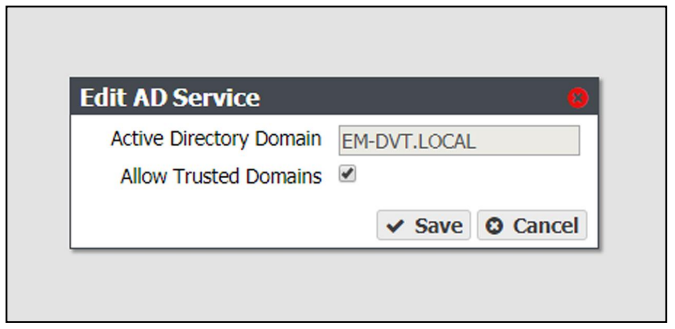
Note: The Active Directory Domain name is unavailable and cannot be changed.
4. Select or clear Allow Trusted Domains.
5. Click Save.
Advanced Parameters are used to adjust or set global or share specific Samba parameters. These parameters are mirrored on both the Active Directory and CIFS Service pages.
Caution: Improperly configuring advanced parameters can expose security vulnerabilities and other serious issues. Advanced parameters should not be configured without a full understanding of the consequences.
Caution: Improperly configuring advanced parameters can expose security vulnerabilities and other serious issues. Advanced parameters should not be configured without a full understanding of the consequences.
1. From the menu bar, select Configuration > Services. The Services screen displays.
2. Double-click the Active Directory row, or select the Active Directory row and select Action > Show Details. The Active Directory details screen displays.
3. Select Action > Add Advanced Parameter. The Add Advanced Parameter dialog box displays.
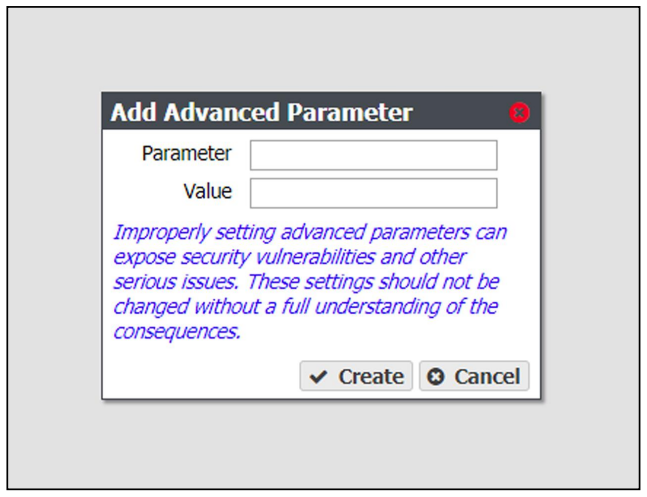
4. Enter the desired Parameter and Value.
5. Click Create.
Caution: Improperly configuring advanced parameters can expose security vulnerabilities and other serious issues. Advanced parameters should not be configured without a full understanding of the consequences.
Caution: Improperly configuring advanced parameters can expose security vulnerabilities and other serious issues. Advanced parameters should not be configured without a full understanding of the consequences.
1. From the menu bar, select Configuration > Services. The Services screen displays.
2. Double-click the Active Directory row, or select the Active Directory row and select Action > Show Details. The Active Directory details screen displays.
3. Select the advanced parameter which you want to edit, then select Action > Edit Advanced Parameter. The Edit Advanced Parameter dialog box displays.
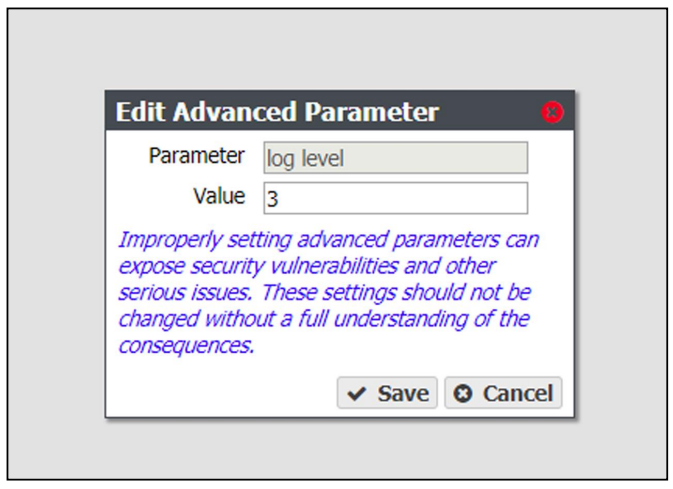
4. The Parameter field is greyed-out and cannot be changed.
5. Enter the desired Value.
6. Click Save.
1. From the menu bar, select Configuration > Services. The Services screen displays.
2. Double-click the Active Directory row, or select the Active Directory row and select Action > Show Details. The Active Directory details screen displays.
3. Select the advanced parameter which you want to delete, then select Action > Delete Advanced Parameter. The Edit Advanced Parameter confirmation window displays.
4. Click Delete.
1. From the menu bar, select Configuration > Services. The Services screen displays .
2. Double-click the Active Directory row, or select the Active Directory row and select Action > Show Details. The Active Directory details screen displays.
3. Select Action > Leave Domain. A confirmation window displays.
4. Click Leave Domain.
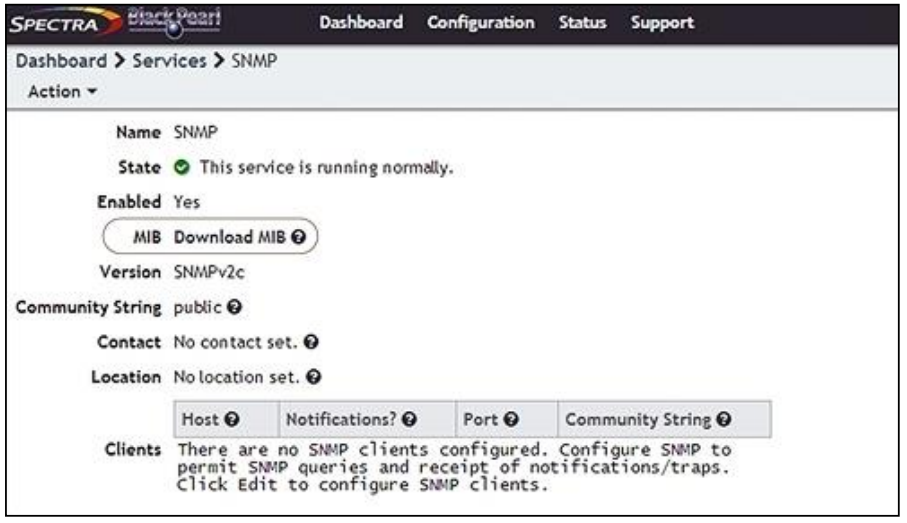
¶ SNMP Service
1. From the menu bar, select Configuration > Services to display the Services screen.
2. Double-click the SNMP service, or select the SNMP service and select Action > Show Details. The SNMP details screen displays.
3. On the SNMP details screen, select Action > Edit. The Edit SNMP Service dialog box displays.
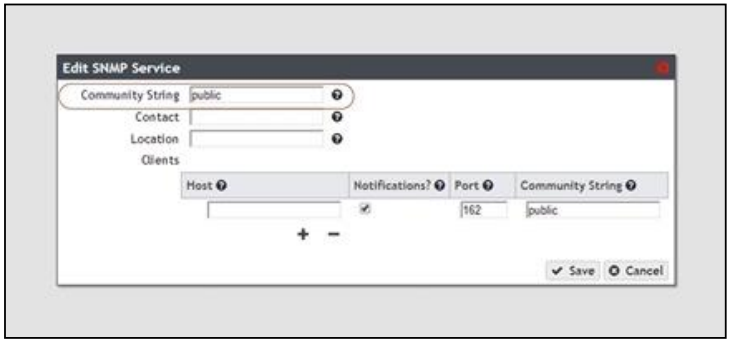
4. If desired, change the value of the Community String. Any incoming SNMP queries that use a different community string than the one set here fail. If no community string is specified, then the BlackPearl NAS solution responds to all SNMP queries.
5. Enter the primary contact for the BlackPearl NAS solution in the Contact field.
6. Enter the physical location of the solution in the Location field.
7. If desired, add clients that are allowed to access the solution using SNMP.
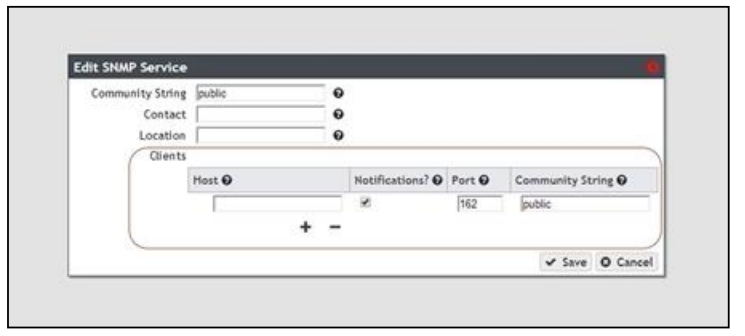
a. Click the + sign to add a client.
b. Enter the host IP address in the Host field.
c. If desired, select the Notifications check box to indicate that the SNMP client should receive outgoing notifications.
d. Enter the port number to be used for SNMP communication in the Port field.
e. Enter a community string value in the Community String field. This community string is set for each client. The clients monitor SNMP notifications for any that use the string specified here.
f. Repeat Step a through Step e as needed to add additional clients.
8. Click Save.
If you want to communicate with the solution using SNMP, you must first download the BlackPearl NAS MIB (Management Information Base) file, and load the file into a compatible network node manager program, such as HP® OpenView® .
1. Select Configuration > Services to display the Services screen.
2. Double-click the SNMP service row, or select the SNMP service row and select Action > Show Details. The SNMP details screen displays.
3. Click Download MIB Using your web browser, save the file to your local host.
4. Load the file into the network node manager program.
5. You can now use your network node manager program to communicate with the BlackPearl NAS solution
¶ Multi-Factor Authentication
The Spectra BlackPearl Nearline solution offers multi-factor authentication as part of Attack Hardened storage, which enhances the security of your solution by using Google Authenticator to confirm the identity of any user trying to log in to the BlackPearl solution. This prevents unauthorized access to the solution even if the user credentials needed to access the system are compromised.
Multi-factor authentication works on a per-user basis by generating a token in the form of a QR code for a selected system user. The user scans the QR code using Google Authenticator to complete the account creation. After the QR code is scanned, Google Authenticator generates a six-digit number every 30 seconds, and does not require cell or internet access to generate these codes.
After multi-factor authentication is enabled, when the user attempts to log in to the BlackPearl user interface, after entering their username and password, they must enter the six-digit number generated by Google Authenticator within 30 seconds to complete the log in.
Note: Only Administrator users can configure the Attack Hardened Service and enable Multi-Factor authentication for a user.
Before you can enable multi-factor authentication for users, you must enable the Attack Hardened service.
1. Select Configuration > Services. The Services screen displays.
2. Select the Attack Hardened service row, then select Action > Edit. The Edit Attack Hardened Service dialog box displays.
Note: You can also double-click the service row to edit the service.
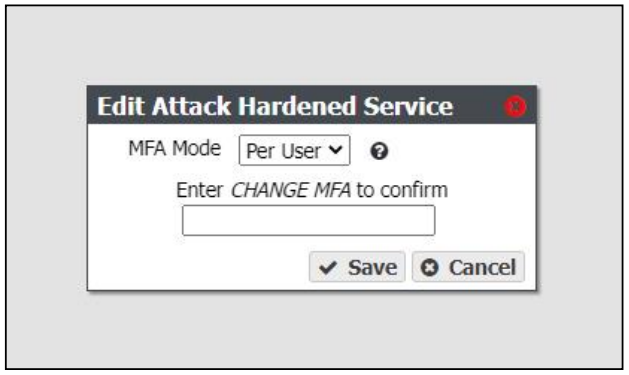
3. Using the MFA Mode drop-down menu, select Per User.
4. In the dialog box, enter CHANGE MFA, then click Save.
Caution: Improperly configuring advanced parameters can expose security vulnerabilities and other serious issues. Advanced parameters should not be configured without a full understanding of the consequences.
Caution: After enabling the service, you must configure each user to use Multi-Factor Authentication before MFA is required for the user to log in to the BlackPearl user interface.
Note: The user account on the target system configured for NAS replication cannot use multi-factor authentication.
1. If necessary, download and install Google Authenticator on your mobile phone.
2. In the BlackPearl user interface, select Configuration > Users. The Users screen displays.
3. If necessary, create a new user then continue with Step 4.
4. Select the user and then select Action > Enable MFA. The Generate MFA Code dialog box displays.
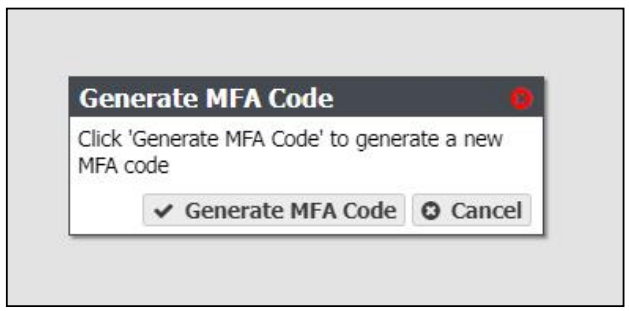
5. Click Generate MFA Code. The Confirm MFA Code dialog box displays.
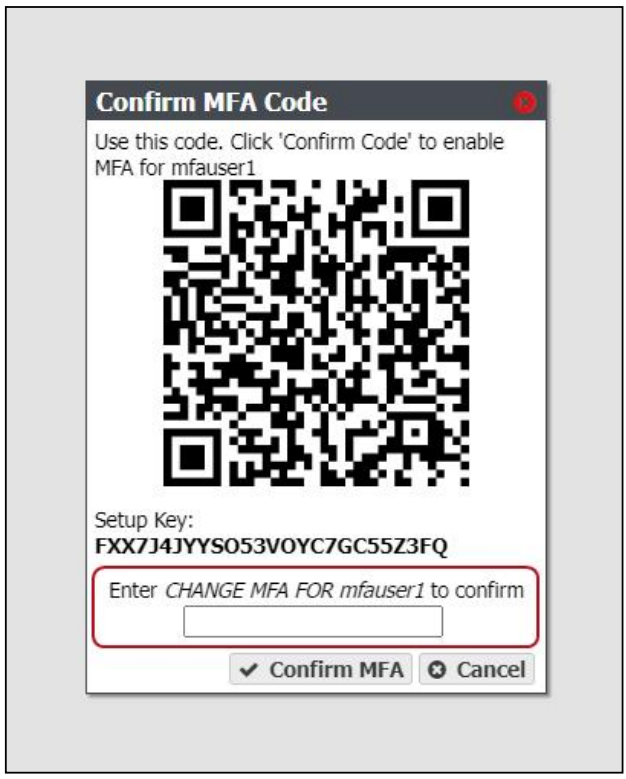
6. Use Google Authenticator on your phone to scan the QR code displayed in the BlackPearl user interface. The username and BlackPearl system name display in Google Authenticator, and the authenticator begins generating codes for the user.
Note: If you cannot scan the QR code, enter the Setup Key into Google Authenticator.
7. In the BlackPearl user interface, in the Confirm MFA Code dialog box, enter CHANGE MFA FOR user's full name, and click Confirm MFA.
The next time the user logs into the BlackPearl user interface, they must use the code generated by Google Authenticator to complete the log in process.
1. Using a standard web browser, enter the IP address for the BlackPearl management port
Note: The BlackPearl user interface uses a secure connection.
2. If necessary, resolve the security certificate warning for the BlackPearl user interface.
The BlackPearl NAS solution ships with non-signed SSL certificates for both the data and management ports. When using the shipped certificates, you must pass a security check every time you attempt to access the management port to view the BlackPearl user interface, or when you attempt to transfer data using the data port.
Notes:
- The absence of the certificate does not affect functionality.
- If desired, you can install signed, trusted SSL certificates for your data and management ports so that you no longer need to pass the security check when accessing these ports.
3. Enter the Username and Password.

4. Using Google Authenticator on your phone, enter the six-digit Multi Factor Authentication code for the user
Note: The code refreshes every 30 sections. If the code refreshes before you complete the login, you must clear the field and enter the new code.
Note: If you have more than one user or BlackPearl system configured in Google Authenticator, use the username@systemname to locate the correct code. The system name is displayed under the product name on the login screen.
5. Click the arrow to log in.
If desired, you can update the token that Google Authenticator uses to generate the MFA code. This is necessary if you disabled the Attack Hardened service, and then later re-enabled the service. This can also be used to provide enhanced security as required by your security environment by updating authentication credentials while still maintaining access for the user.
1. In the BlackPearl user interface, select Configuration > Users. The Users screen displays.
2. Select the user and then select Action > Update MFA. The Generate MFA Code dialog box displays.
3. Click Generate MFA Code. The Confirm MFA Code dialog box displays.
4. Use Google Authenticator on your phone to scan the QR code displayed in the BlackPearl user interface. The username and BlackPearl system name display in Google Authenticator, and the authenticator begins generating codes for the user. able MFA for User
Note: If you cannot scan the QR code, enter the Setup Key into Google Authenticator
5. In the BlackPearl user interface, in the Confirm MFA Code dialog box, enter CHANGE MFA FOR user's full name, and click Confirm MFA.
The next time the user logs into the BlackPearl user interface, they must use the code generated by Google Authenticator to complete the login.
Use this option to no longer require a user to enter an MFA code when logging in to the BlackPearl user interface.
1. In the BlackPearl user interface, select Configuration > Users. The Users screen displays.
2. Select the user and then select Action > Disable MFA. The Disable MFA dialog box displays.
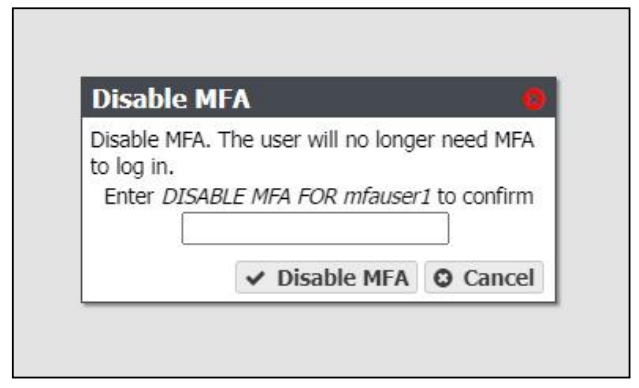
3. In the dialog box, enter DISABLE MFA FOR user's full name, and click Disable MFA.
The user is no longer required to enter a six-digit authentication code when logging in to the BlackPearl user interface.
Disabling the Attack Hardened service disables multi-factor authentication for the BlackPearl solution.
Note: Disabling the Attack Hardened service deletes the tokens for all users configured to use multifactor authentication. If you re-enable the Attack Hardened service, each user will need to update their multi-factor authentication token.
1. Select Configuration > Services. The Services screen displays .
2. Select the Attack Hardened service row, then select Action > Edit. The Edit Attack Hardened Service dialog box displays.
Note: You can also double-click the service row to edit the service.
3. Using the MFA Mode drop-down menu, select Off.
4. In the dialog box, enter CHANGE MFA, and then click Save.
¶ Configure Vail Sphere
Use the instructions in this section to configure the BlackPearl NAS solution to communicate with a Vail sphere. After registering with a Vail sphere, you can create NAS-based Vail S3 shares on the BlackPearl NAS solution.
Notes:
- You can only register or edit a Vail sphere after entering a Vail activation key
- All other aspects of the Vail application are controlled in the Vail management console
The Vail service configures a BlackPearl NAS solution for use with a Spectra Vail sphere. The Vail service only displays in the Services menu after an activation key is entered. Use the instructions in this section to register a Vail sphere with a BlackPearl NAS solution.
See the Vail Online Help for information about registering the BlackPearl Nearline solution with a Vail sphere.
Note: These instructions will be updated in the next revision of the BlackPearl User Guide.
If desired, you can change the ports that the BlackPearl NAS solution uses to communicate with a Vail sphere.
1. From the menu bar, select Configuration > Services to display the Services screen.
2. Double-click the Sphere service, or select the service, and then select Action > Show Details. The details screen for the Sphere service displays.
3. Select Action > Edit. The Edit Vail Service dialog box displays.
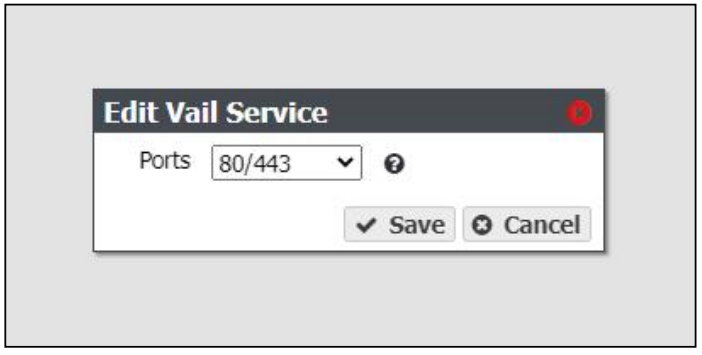
4. Use the Ports drop-down menu to select the desired ports.
5. Click Save.
¶ Configure and Use Encryption
If your BlackPearl NAS solution includes disk or flash Self Encrypting Drives (SEDs), use the encryption service to set the level of encryption, configure passwords, and unlock the drives so that they are usable for data transfer.
Notes:
- An activation key is required to enable this feature.
- The encryption provided by SEDs is 'encryption at rest'. If a drive is stolen the data on it is unreadable.
Use the encryption service to set the level of encryption and create a password to unlock the drives following a solution power cycle. You can select to store the password on the solution, so that the drives are unlocked automatically, or to save the password to a USB key that is used when needed to unlock the drives, and is otherwise stored in a safe location.
Caution: Spectra Logic recommends creating and storing multiple copies of the password used to encrypt data to avoid losing access to encrypted data.
Caution: Spectra Logic recommends creating and storing multiple copies of the password used to encrypt data to avoid losing access to encrypted data.
1. If necessary, enter the activation key to enable the encryption service.
2. From the menu bar, select Configuration > Services to display the Services screen.
3. Double-click the Encryption service, or select the service, and then select Action > Show Details. The details screen for the Encryption service displays.
4. Select Action > Edit Service. The Edit Encryption Service dialog box displays.
Note: If multi-factor authorization is enabled for the user currently logged in to the BlackPearl user interface, an additional entry field displays in the Edit Encryption Service dialog box.
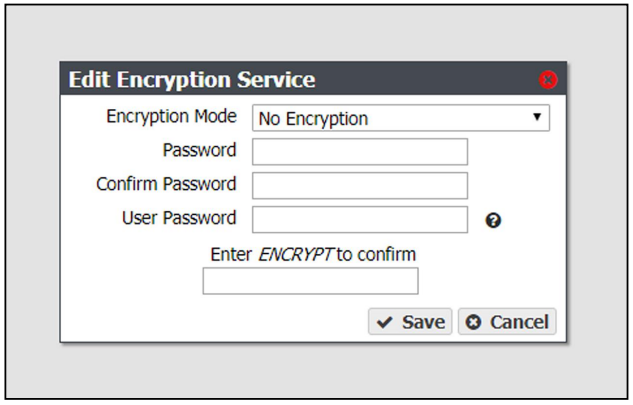
5. Use the Encryption Mode drop-down menu to set the encryption mode.
| Parameter | Description |
| No Encryption |
This setting is included in the drop-down menu as the default so that you do not accidentally select an undesired mode of encryption. If selected, the self-encrypting drives do not use encryption. Data stored on the drives is not encrypted. Note: This setting does not disable encryption on the drives once they are encrypted. Drives must be set to unencrypted for each storage pool. |
| Encrypt and Store Password |
The self-encrypting drives encrypt data transferred to them, and the password to unlock the drives is stored on the BlackPearl NAS solution. The drives are automatically unlocked when the BlackPearl NAS solution initializes. Caution: Even though the password is stored on the system, it is important to record the password and store it in a secure location to avoid losing access to the encrypted data. The password may also be required in the cases of chassis replacement, or the addition of more BlackPearl systems to the storage architecture that may access the encrypted drives. Spectra Logic recommends storing multiple copies of the password. |
| Encrypt and Don't Store Password |
The self-encrypting drives encrypt data transferred to them, but the BlackPearl NASsolution does not store the password to unlock the drives. You must manually enter the password each time the BlackPearl NASsolution initializes. Note: This option is no longer available starting with BlackPearl OS 5.6. This setting is also allows you to create a USB device with the encryption password. You can use the USB device when the solution initializes to unlock the drives. Store the USB device in a safe location, not attached to the BlackPearl NASsolution, at all other times. Caution: Since the password is not stored on the system, you must record and store multiple copies of the password using either USB drives and/or manual records to avoid losing access to the encrypted data. |
6. Enter a Password to unlock the self-encrypting drives, and then Confirm the password.
7. Enter the User Password of the user currently logged in to the BlackPearl user interface.
8. If necessary, enter the Multi Factor Authentication code for the user.
Note: This field only displays if multi-factor authentication is enabled for the currently logged in user.
9. Enter ENCRYPT into the confirmation dialog box.
10.Click Save.
Note: You may need to navigate away from the encryption details screen and then back for the solution to update the information on the details screen.
Use the instructions in this section to export the encryption key to a USB drive for storage in case of disaster recovery. This key can be used to re-import the encryption key if necessary.
Caution: Spectra Logic recommends creating and storing multiple copies of the password used to encrypt data to avoid losing access to encrypted data. Additionally, Spectra Logic recommends exporting the encryption key to multiple types of storage media
If your BlackPearl system is running BlackPearl OS 5.5 or earlier, and if the encryption service is configured to not store the password on the BlackPearl NAS solution, the USB key can be used to unlock the encrypted drives when the BlackPearl system initializes. Insert the USB key when the solution initializes to unlock the drives. Remove it from the solution USB port and store it in a safe location at all other times.
Note: This feature is no longer available starting with BlackPearl OS 5.6.
1. From the menu bar, select Configuration > Services to display the Services screen (see Figure 91 on page 146).
2. Double-click the Encryption service, or select the service, and then select Action > Show Details. The details screen for the Encryption service displays.
3. Select Action > Export Key to USB. The Export key to USB confirmation window displays.
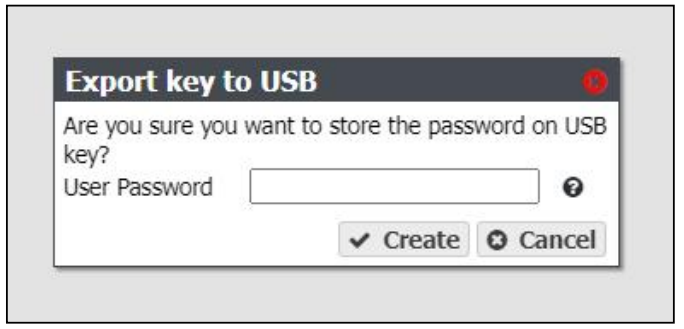
4. Enter the User Password of the user currently logged into the BlackPearl user interface.
5. Click Create.
Note: Once created, remove the USB key from the solution and store it in a safe location until it is needed.
Use the instructions in this section to export the encryption key to a USB drive for storage in case of disaster recovery. This key can be used to re-import the encryption key if necessary.
Caution: Spectra Logic recommends creating and storing multiple copies of the password used to encrypt data to avoid losing access to encrypted data. Additionally, Spectra Logic recommends exporting the encryption key to multiple types of storage media
You must configure an email recipient and an SMTP server before you can email the encryption key. If necessary, use the instructions in the sections below.
1. From the menu bar, select Configuration > Services to display the Services screen.
2. Double-click the Encryption service, or select the service, and select Action > Show Details. The details screen for the Encryption service displays.
3. Select Action > Email key. The Email key confirmation window displays.
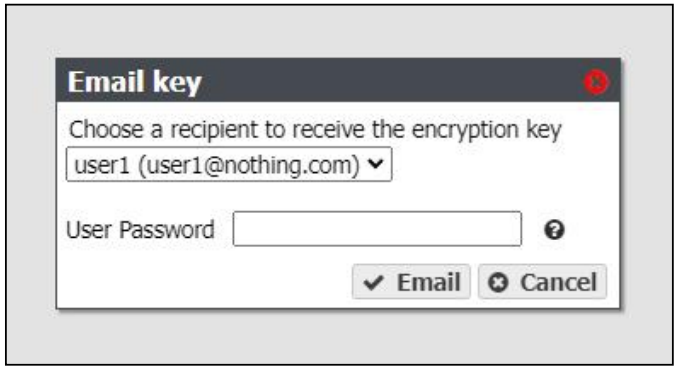
4. Use the drop-down menu to select an email recipient to receive the encryption key.
5. Enter the User Password for the currently logged into the BlackPearl user interface.
6. Click Email.
If desired, you can change the password used to unlock the self-encrypting drives.
1. From the menu bar, select Configuration > Services to display the Services screen.
2. Double-click the Encryption service, or select the service, and then select Action > Show Details. The details screen for the Encryption service displays.
3. Select Action > Change Password. The Change Password dialog box displays.
Note: If multi-factor authentication is enabled for the user currently logged in to the BlackPearl user interface, an additional entry field displays in the Change Password dialog box.
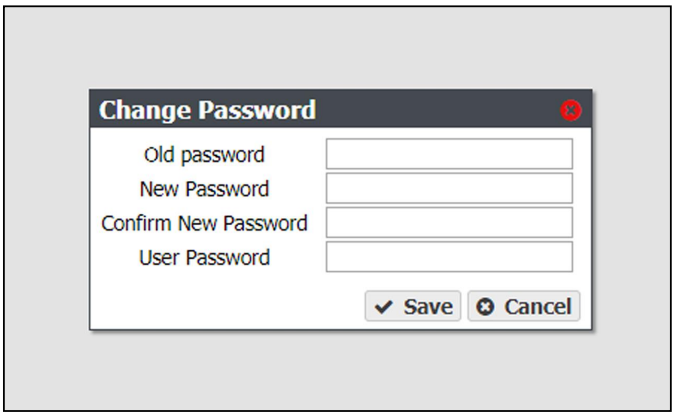
4. Enter the (current) Old Password.
5. Enter the desired New Password, and then Confirm the new password.
6. Enter the User Password of the user currently logged in to the BlackPearl user interface.
7. If necessary, enter the Multi Factor Authentication code for the user.
Note: This field only displays if multi-factor authentication is enabled for the currently logged in user.
8. Click Save.
Important: After changing the password, update the USB keys and/or manual records stored in secure locations.
If necessary, use the instructions below to manually unlock the self-encrypting drives after the solution initializes.
1. From the menu bar, select Configuration > Services to display the Services screen.
2. Double-click the Encryption service, or select the service, and then select Action > Show Details. The details screen for the Encryption service displays.
3. Select Action > Unlock Drives. The Enter Password dialog box displays.

4. Enter the encryption Password.
5. Enter the User Password of the user currently logged in to the BlackPearl user interface.
6. Click Save.
Use the steps in this section to encrypt or decrypt the drives in a storage pool after creating the pool.
1. From the menu bar, select Configuration > NAS > Pools.
2. Select the disk pool for which you want to enable encryption, then select Action > Edit.
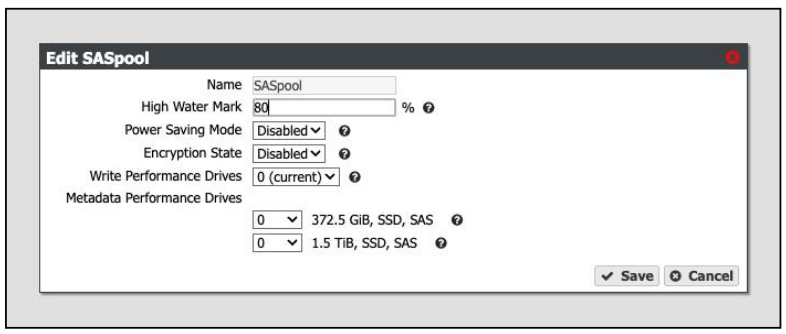
3. Using the Encryption State drop-down menu, select Enabled to encrypt the drives in the pool or Disabled to decrypt the drives.
4. If desired, make any other changes.
5. Click Save.
If you forget the encryption password, you are unable to unlock the drives. If you want to reuse the drives, you need to erase the drive by entering the Physical Secure ID (PSID) in the BlackPearl user interface.
The PSID string is printed on the label physically attached to the drive. It is not available from any other source. Before you can perform a PSID erase, you must remove the drive from the enclosure and record its PSID value.
Note: PSID erasure of a drive is useful if you need to return a failed drive to Spectra Logic. When a drive is PSID erased, Spectra Logic cannot access data on the drive.
Caution: Performing a PSID Erase on a drive makes all data on the drive permanently inaccessible.
Use the instructions in this section to perform a PSID erase on the drive.
1. From the menu bar, select Status > Hardware or click the Hardware pane on the Dashboard, or click the Hardware link on the status bar. The Hardware screen displays .
2. Click Data Drives. The hardware screen refreshes and displays all disk drives present in the solution.
3. Record the slot number and serial number for each drive you want to PSID erase.
4. Power down the solution.
5. Locate the drive(s) in the chassis using the slot number and verify the serial number(s) you recorded in Step 3.
6. Locate the PSID value on the drive label and record the value.
7. Repeat Step 5 and Step 6 for any additional drives you want to erase.
8. Power on the solution.
9. Log into the solution.
10. From the menu bar, select Status > Hardware or click the Hardware pane on the Dashboard, or click the Hardware link on the status bar. The Hardware screen displays.
11. Click Data Drives. The hardware screen refreshes and displays all disk drives present in the solution.
12. On the row of the drive you want to erase, click PSID Erase. The PSID Erase dialog box displays.

13.Enter the PSID value you recorded in Step 6 in the PSID entry field.
14.Type ERASE ALL DATA in the confirmation entry field.
Caution: Performing a PSID Erase on a drive permanently erases all data on the drive.
15. Click Erase.
16.Repeat Step 12 through Step 15 for any additional drives you want to erase.
¶ Configure Certificates
The BlackPearl NAS solution ships with non-signed SSL certificates for both the data and management ports on the solution. Because the certificates are not signed, you must pass a security check every time you attempt to access the management port to view the BlackPearl user interface, or when you attempt to transfer data using the data port. If desired, you can install signed, trusted SSL certificates for your data and management ports so that you no longer need to pass the security check when accessing these ports. The BlackPearl NAS solution accepts intermediate (chain) SSL certificates, and accepts RSA, DSA, and ECC certificates. The BlackPearl NAS solution accepts both encrypted and nonencrypted certificates.
Use the instructions in this section to install an SSL certificate.
1. From the menu bar, select Configuration > Certificates. The Certificates screen displays.

2. Select either the Management or Data row, depending on for which port you want to install a new SSL certificate.
3. Select Action > Import Certificate. The Import Certificate dialog box displays
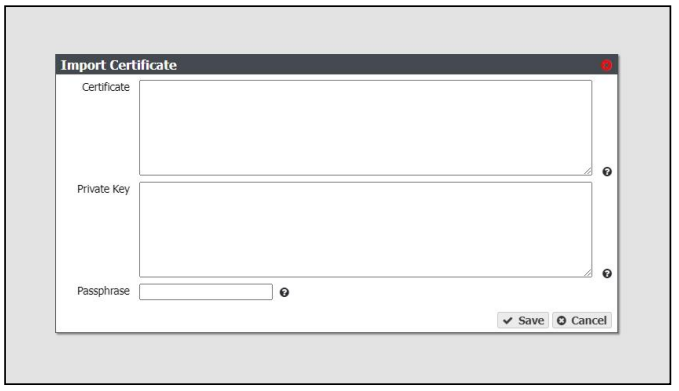
4. From your source SSL certificate file, copy the certificate portion of the file into your host’s cache, and then paste the contents into the Certificate entry box
Note: The certificate must be in PEM format.
5. From your source SSL certificate file, copy the private key portion of the file into your host’s cache, and then paste the contents into the Private Key entry box.
Note: The private key must be in PEM format.
6. If necessary, enter the Passphrase. The Passphrase is used to encrypt the private key.
7. Click Save.
¶ Remote Logging
Remote Logging is a feature that allows the BlackPearl system to send any messages generated by the system to a syslog server.
Use the instructions in this section to enable remote logging.
1. Enter the Remote Logging activation key as described in Manually Enter Activation Keys on the next page.
2. From the menu bar, select Configuration > Services. The Services screen displays.
3. Double-click the Remote Logging service, or select the service and then select Action > Show Details. The details screen for the remote logging service displays.
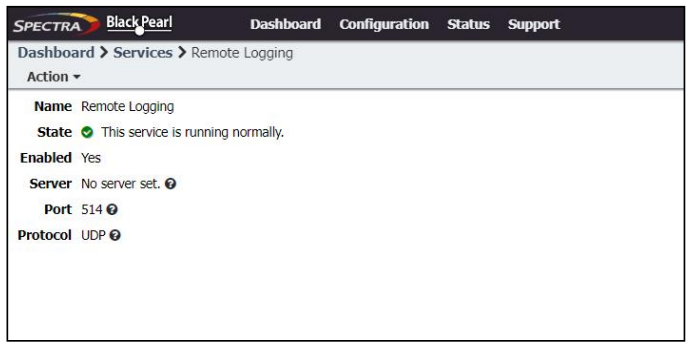
4. Select Action > Edit. The Edit Remote Logging Service dialog box displays.

5. Enter a hostname or IP address for the remote logging Server.
6. Enter the Port used to communicate with the remote logging server. Note: The default port is 514.
7. Click Save.
¶ Manually Enter Activation Keys
After entering certain Product keys, the system automatically reboots. Starting with BlackPearl OS 5.4.2, after the system initializes, you are automatically logged into the BlackPearl management interface and do not need to enter login information.
Use the following instructions to manually enter activation keys.
1. Determine the order for installing the activation keys.
- If this is not an initial installation, you can enter activation keys in any order
- If you want to manually enter the activation keys for an initial installation, they must be entered in the following order
Important: For an initial installation, the activation keys must be entered in the order described in these instructions. Failure to enter the keys in the proper order causes an error
a. Capacity Keys:
| Key Type | Description |
| NAS/S3 SAS Count | Enables the specified number of SAS drives present in the system for NAS storage. |
| NAS/S3 SATA Count | Enables the specified number of SATA drives present in the system for NAS storage. |
| NAS/S3 SSD Count | Enables the specified number of SSDs present in the system for NAS storage. |
b. All other keys - Any additional keys included on the Software Activation Key Certificate, such as the Product Key or Software Update key, can be entered in any order.
2. Select Support > Activation Keys to display the Activation Keys screen. Any previously entered keys are listed.
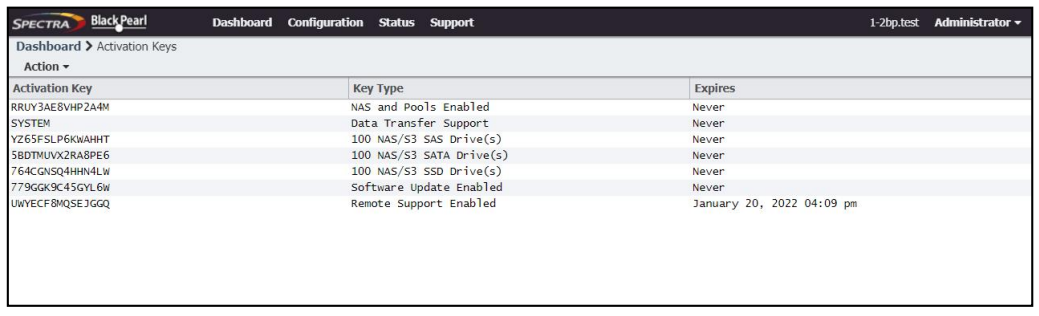
3. Select Action > New. The Enter Activation Key dialog box displays.

4. Enter the key, exactly as provided, in the Activation Key field and click Create to save the key on the solution. The Activation Keys screen displays with the newly entered key listed.
5. If necessary, repeat Step 3 through Step 4 to add additional keys.