¶ Advanced Bucket Management
The BlackPearl gateway provides a DS3 front end interface to disk, tape and cloud storage. The BlackPearl Advanced Bucket Management (ABM) feature automates many aspects of deep storage including policy based multiple copies on diverse media types without the need for expensive middleware to operate the libraries and stream data to tape drives. The BlackPearl gateway delivers seamless data management enabling infinite retention, seamless growth, and unlimited retrieval of data for as low as pennies per Gigabyte.
Important: It is difficult and time consuming to change a data policy once the gateway writes data to a bucket using the data policy. Make sure that you understand the concepts in Advanced Bucket Management and have thoughtfully planned your data policies before you start using the BlackPearl gateway to store data.
¶ Advanced Bucket Management Components:
| ABM Component | Description |
| Spectra's modified DS3 protocol, managing data transfers from BlackPearl Nearline gateway to Spectra Logic tape | |
|
DS3 Clients |
Software clients which interact with BlackPearl via DS3 API integration |
| Physical storage on BlackPearl nearline serving as transient storage for all transfered data | |
| Collection of data partitions and media types | |
| Policies define data integrity, job priority, data persistence, location and persistence. | |
| Defines how long data will be available before expiration (permanent vs. expried) | |
| Rules which control replication to BlackPearl, Amazon S3, and Azure | |
| Strategy for maintaining offline/ejected tape copies of data | |
| Storage Targets accessible to BlackPearl | |
| BlackPearl SAS Expansion nodes for Online Storage or Nearline Storage | |
| Storage Disk pools create storage partitions on SAS expansion nodes. |
¶ Create Pools and Partitions
A disk pool groups a set of physical drives together to create a virtual drive that the operating system treats as a single physical drive. There are two types of disk pools:
- Nearline Storage Disk Pool - If all drives in the pool are cable of setting an idle timer, Nearline storage disk pools can be configured to spin down after 60 minutes without I/O, for power savings.
- Online Storage Disk Pool - Online storage disk pools remain powered on at all times for fast access to data.
Online and Nearline Storage disk pools use compression. This allows the BlackPearl gateway to store more data.
If desired, select the check box to enable data compression with ZFS to allow the BlackPearl gateway to store more data. If the data being written is compressible there is typically in increase with store and restore operations, because less data is transferred to and from the disk drives. The size reduction of transferred files depends on how much the system can compress the data, and may fluctuate.
The data compression process uses CPU cycles to perform the compression. If compression is enabled for non-compressible data, for example JPEG images or movie files that use the H. 264 codec, the compression process may use an excessive number of CPU cycles, slowing the overall performance of the gateway. This impact is less evident with Gen2 master nodes.
Note: When viewing the details of an online or nearline storage disk pool, the user interface displays the physically used space on the pool, not the logically used space.
Create Disk Partition
Once a disk pool is created, it can be added to a disk partition.
Note: Nearline pools created on a 96-bay expansion node have a hard coded capacity utilization limit percentage. On gateways running BlackPearl OS 5.2 or later, this percentage is 95%. On gateways running BlackPearl OS 5.1.x or older, the capacity limit percentage is 87%.
1. From the menu bar, select Configuration > Advanced Bucket Management > Storage & Policy Management to display the Advanced Bucket Management screen.

2. Select Action > New Nearline Disk Pool. The New Nearline Disk Pool dialog box displays.
Note: The Storage Pool Preview pane does not display until you have selected the disks you want to use in the disk pool.
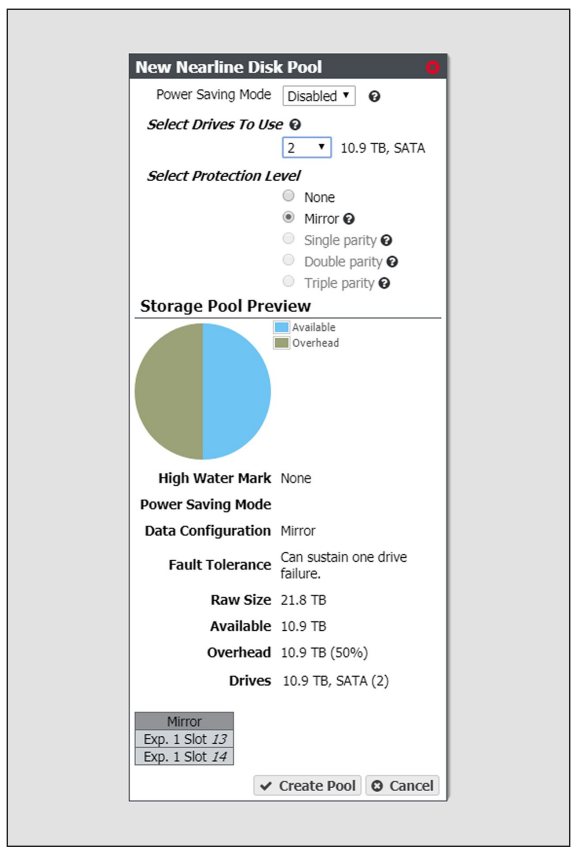
3. Configure the disk pool as required for your environment. As you make changes, the screen updates to show the characteristics of the new pool.
| For This Option | Do the Following |
| Power Saving Mode |
Using the drop-down menu, select the desired Power Saving Mode. Enabling the power saving mode sets the standby timer to 60 minutes for all drives in the pool, but only if all drives in the pool are capable of using a standby timer. When the disk pool is idle for 60 minutes, the drives spindown to conserve power. Note: To use this feature, all drives in the storage pool must be power‐saving compatible. |
| Select Drives to Use |
Use the drop-down menu to select the number of drives to include in the pool. If your gateway contains more than one type of disk drive, multiple drop-down menus are present, but only one type can be assigned to a pool. Any drive not in a disk pool acts as a global spare. A global spare drive is activated as soon as a drive configured in a disk pool fails. |
| Select Protection Level |
Use the radio buttons to select the protection level for the pool. Only one option can be selected. Use the Storage Pool Preview information to compare the fault tolerance and required overhead for each configuration. None—The pool is not configured to provide data protection. Any drive failure results in data loss. Note: Spectra Logic does not recommend setting protection to None. Mirror—Data is striped across two mirrors. Any detected data corruption is corrected using checksums. This type of RAID offers the best performance for small random reads and writes. Single parity—Data is striped across multiple single-parity arrays, which can tolerate one drive failure without data loss. This type of RAID has faster performance than double- and triple-parity based RAIDs. Double parity—Data is striped across multiple double-parity arrays, which can tolerate two drive failures without data loss. In most cases, doubleparity provides the best balance between data protection, performance, and storage capacity. Triple parity—Data is striped across multiple triple-parity arrays, which can tolerate three drive failures without data loss. This type of RAID provides the most data protection |
4. Click Create Pool. The new nearline disk pool is listed on the Advanced Bucket Management screen
Use the instructions in this section to create an online disk pool.
1. From the menu bar, select Configuration > Advanced Bucket Management > Storage & Policy Management to display the Advanced Bucket Management screen
2. Select Action > New Online Disk Pool. The New Online Disk Pool dialog box displays.
Note: The Storage Pool Preview pane does not display until you have selected the disks you want to use in the disk pool.
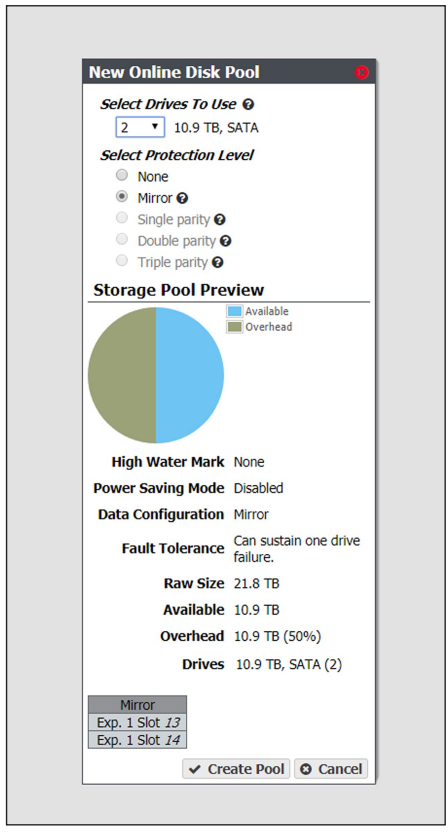
3. Configure the disk pool as required for your environment. As you make changes, the screen updates to show the characteristics of the new pool.
| For This Option | Do the Following |
| Select Drives to Use |
Use the drop-down menu to select the number of drives to include in the pool. If your gateway contains more than one type of disk drive, multiple drop-down menus are present, but only one type can be assigned to a pool. Any drive not in a disk pool acts as a global spare. A global spare drive is activated as soon as a drive configured in a disk pool fails. |
| Select Protection Level |
Use the radio buttons to select the protection level for the pool. Only one option can be selected. Use the Storage Pool Preview information to compare the fault tolerance and required overhead for each configuration. None—The pool is not configured to provide data protection. Any drive failure results in data loss. Mirror—Data is striped across two mirrors. Any detected data corruption is corrected using checksums. This type of RAID offers the best performance for small random reads and writes. Single parity—Data is striped across multiple single-parity arrays, which can tolerate one drive failure without data loss. This type of RAID has faster performance than double- and triple-parity based RAIDs. Double parity—Data is striped across multiple double-parity arrays, which can tolerate two drive failures without data loss. In most cases, doubleparity provides the best balance between data protection, performance, and storage capacity. Triple parity—Data is striped across multiple triple-parity arrays, which can tolerate three drive failures without data loss. This type of RAID provides the most data protection |
4. Click Create Pool. The new online disk pool is listed on the Advanced Bucket Management screen.
Disk partitions are collections of one or more disk pools. Disk partitions are specified in storage domains as storage targets.
Use the instructions in this section to create a new disk partition.
1. From the menu bar, select Configuration > Advanced Bucket Management > Storage & Policy Management. The Advanced Bucket Management screen displays
2. Select Action > New Disk Partition. The New Disk Partition dialog box displays.
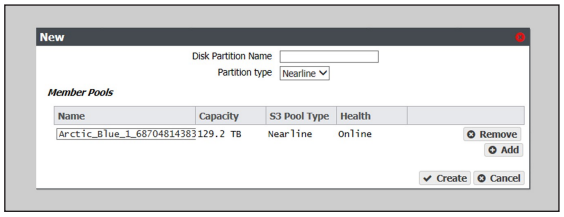
3. Enter a name for the disk partition in the Disk Partition Name field.
4. Use the drop-down menu to select the Partition type. You cannot mix different types of disk pools in a disk partition.
- Select Online to use a disk pool that is always powered on and available for access.
- Select Nearline to use a disk pool that can be configured to spin down after 60 minutes without I/O, for power savings
5. Add a disk pool to the disk partition.
a. In the Member Pools pane, click Add. A new row appears in the pane.
b. Use the Name drop down menu to select a disk pool from the list of previously configured disk pools. The Capacity, Type, and Health of the disk pool display.
Note: It may take up to 1 minute after creating an online or nearline disk pool before it displays in the Member Pools list.
c. If desired, repeat Step a and Step b to add additional disk pools to the disk partition.
6. Click Create. The new disk partition displays on the Advanced Bucket Management screen.
Once the BlackPearl Nearline Gateway detects a partition on a tape library connected to it, the tape partition is automatically listed on the Advanced Bucket Management screen.
Note: If the BlackPearl gateway is configured to transfer data to tape, make sure the partitions configured for use by the BlackPearl gateway do not contain WORM (Write Once-Read Many) media. The BlackPearl gateway is not compatible with WORM media.
¶ Create Replication Target
Replication targets allow you to configure the BlackPearl gateway to automatically replicate data to another BlackPearl gateway, or to the Azure or Amazon S3 clouds.
Note: The instructions below describe configuring a target that is later associated with a data policy. For instructions on creating NAS replication, see Configure the NAS Replication Service.
Configuring a BlackPearl target allows a data policy on one BlackPearl gateway to replicate data to a second gateway. If data is sent to a data policy that is not configured for replication, the data is not replicated to the target gateway.
With replication enabled, as soon as data is PUT to the cache of the source gateway it begins replicating to the target gateway. Storing multiple copies of the same data on different BlackPearl gateways provides enhanced data security and disaster recovery if the source gateway fails. When you delete data from the source gateway, you can optionally specify to have the data deleted from the target gateway as well.
Important: Spectra Logic recommends using the same versioning settings on both the source and target BlackPearl gateways.
Note: If the source BlackPearl gateway uses object versioning but the target BlackPearl gateway does not, when an object is deleted on the source gateway, the delete is replicated to the target gateway. However, when IOM validates the data on the two gateways, it detects that the object still exists on the source gateway, and self-heals the object on the target gateway again.
Use the instructions in this section to configure a BlackPearl target.
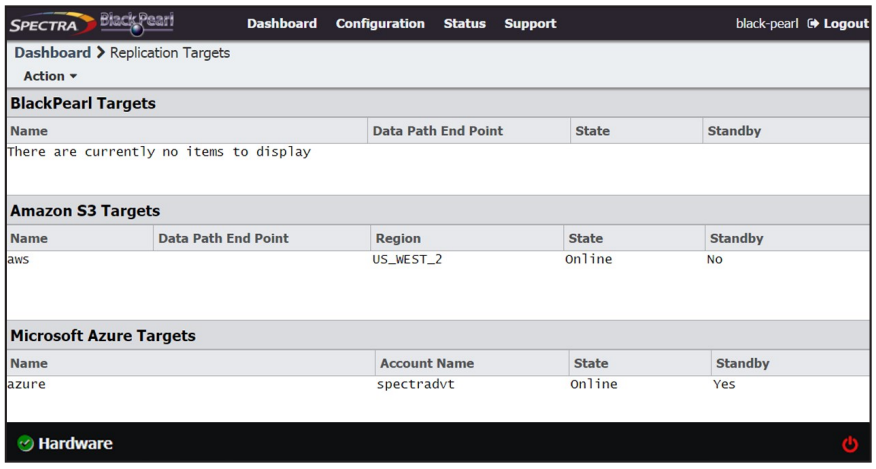
1. From the menu bar, select Configuration > Advanced Bucket Management > Replication Targets to display the Replication Targets screen.
2. Select Action > New BlackPearl Target. The New BlackPearl Target dialog box displays.

3. Enter a name for the BlackPearl target in the Name field.
4. Enter the system name of the target gateway, or the IP address of the target gateway’s data port, as the Data Path End Point.
Note: Do not use the IP address of the target gateway’s management port.
5. Using the drop-down menu, select a value for the Data Path Port. Set this to the value of the port on which the target gateway’s Amazon compatible S3 service is running.
Note: Port selections for secure transfer (443/8443) are grayed-out and not able to be selected until you select Data Path HTTPS in Step 8 below.
6. Enter the username or Amazon S3 Access ID of a user with administrator privileges on the target gateway in the Administrator Username or Amazon S3 Access ID field.
Note: Administrator credentials are used to configure and maintain the source/target relationship. They are not used for user driven replication operations.
7. In the Amazon Administrator S3 Secret Key field, enter the Amazon S3 Secret Key of the user you entered in Step 6.
8. Select Data Path HTTPS to enable secure data transfer with the BlackPearl target. When this option is selected, the Data Path Port setting automatically changes to 443. Repeat Step 5 if you want to change the data path port to 8443.
Important: Using HTTPS for data transfer greatly impacts data transfer speed. Spectra Logic recommends leaving this disabled if it is not required for your data storage environment.
9. If you enabled Data Path HTTPS, you can optionally select Data Path Verify Certificate to verify the SSL certificate of the BlackPearl target. This option is not available if you did not enable Data Path HTTPS.
Note: Do not enable this option if the BlackPearl target uses the default self-signed SSL certificate.
10. Using the drop-down menu, select a value for the Default Read Preference. Data is normally read from the source gateway whenever possible. This setting determines from what location data is read back from the target gateway, if needed.
| Name | Description |
| Last Resort | The source gateway only reads data from the target gateway if the source gateway cannot read from any of its own data partitions. |
| Minimum Latency |
The source gateway reads the data from the data partition with the least latency no matter whether it is connected to the source gateway or the target gateway. For example, if the source gateway only has the data on tape and the target gateway has the data on pool, the data is read from the target pool. Note: Only use MINIMUM LATENCY when the network between the source and target is very inexpensive. |
| After Online Pool | The source gateway only reads data from the target gateway if the source gateway cannot read from an online pool. |
| After Nearline Pool | l The source gateway only reads data from the target gateway if the source gateway cannot read from a nearline pool. |
| After Non-Exportable Pool | The source gateway only reads data from the target gateway if the source gateway cannot read from secure media. |
| Never | Data is never read from the target gateway. |
11. Using the drop-down menu, select a value for Access Control Replication
| Name | Description |
| None |
No access control information is replicated to the BlackPearl target. Note: The Administrator secret key on both the source and target BlackPearl gateways must be identical when setting Access Control Replication to None. |
| Users | User creation, modification, and deletion is replicated to the BlackPearl target. |
12. If you selected Users in Step 11, you can optionally enter the name of a data policy previously configured on the target gateway to use as the Replicated User Default Data Policy. If configured, the gateway uses this target data policy as the default data policy for any users replicated to the target.
13. Optionally, enter the IP address of the Data Path Proxy Server. If configured, the source gateway uses the specified proxy to connect to the target gateway.
14. Click Create. The new BlackPearl target appears on the Advanced Bucket Management screen.
Configuring an Amazon S3 target allows a data policy on the BlackPearl gateway to replicate data to the Amazon S3 cloud. With replication enabled, as soon as data is PUT to the cache of the source gateway it begins replication to the Amazon S3 cloud.
Note: Only Amazon Web Services (AWS) S3 is qualified as an Amazon S3 target. Other Amazon compatible S3 services have not been tested.
Restrictions
The following restrictions apply to creating an Amazon S3 target:
- You cannot create two Amazon S3 targets using the same Data Path End Point and Access Key.
- You cannot create two Amazon S3 targets using the same Region and Access Key when the Data Path End Point has no value.
- You cannot link multiple Amazon S3 targets to the same Data Policy when both targets have no value for the Data Path End Point, and the prefix and suffix are the same for both targets.
Use the instructions in this section to configure an Amazon S3 target.
1. From the menu bar, select Configuration > Advanced Bucket Management > Replication Targets to display the Replication Targets screen.
2. Select Action > New Amazon S3 Target. The New Amazon S3 Target dialog box displays.
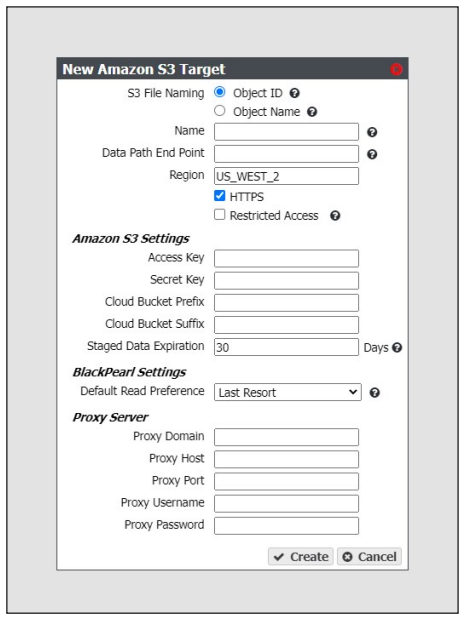
3. Select the type of Amazon S3 File Naming to use for the target.
- Object ID - objects display a UUID when viewed on the Amazon target.
- Object Name - objects display their name when viewed on the Amazon target.
4. Enter a name for the Amazon S3 target in the Name field.
5. Enter a Data Path End Point (system name or IP address) or a Region to identify the remote Amazon S3 target.
|
Acceptable regions are: Note: Dashes (-) in the standard AWS S3 region code must be replaced by underscores (_) in the text entered in the Region field. |
||
|
|
|
Notes:
- If you enter both a Data Path End Point and a Region, the gateway uses the Data Path End Point and ignores the Region.
- You cannot use the same Data Path End Point or Region for multiple Amazon S3 targets.
6. By default, HTTPS is selected so that the replication uses a secure connection. If desired, clear HTTPS to use HTTP.
7. If desired, select Restricted Access to limit access to a specific set of credentials and buckets set in your Amazon S3 account. This setting removes the verification the BlackPearl gateway uses to confirm valid credentials when a data path endpoint and region are entered in Step 5.
Note: Spectra Logic recommends against using Restricted Access.
8. Enter the Amazon S3 Access Key of a user with administrator privileges for the Amazon S3 account in the Access Key field.
Note: Administrator credentials are used to configure and maintain the source/target relationship. They are not used for user driven replication operations.
9. In the Secret Key field, enter the Amazon S3 Secret Key of the user you entered in Step 8.
10. Optionally, enter a Cloud Bucket Prefix and/or Cloud Bucket Suffix. Bucket names on the BlackPearl gateway must be unique within the gateway, but bucket names in AWS S3 must be unique across the world. To permit friendlier, shorter local bucket names on the BlackPearl gateway while avoiding naming conflicts with AWS S3, the gateway adds the defined Cloud Bucket Prefix and Cloud Bucket Suffix to the BlackPearl bucket name when it replicates the bucket. For example, if Cloud Bucket Prefix=prefix, Cloud Bucket Suffix=suffix, and the bucket name=name, the resulting name of the bucket on the Amazon S3 target is prefix-name-suffix.
Note: The prefix and/or suffix must adhere to the replication target naming requirements
11. Enter a Staged Data Expiration time in days using any value between 1 and 365. The default is 30. When data is pre-staged by the Amazon S3 service so that the BlackPearl gateway can retrieve the data in an Amazon compatible S3-standard manner, you must specify an expiration period in days. This is the minimum number of days before the pre-staged copy expires. If the gateway does not retrieve all of the data before the copy expires, it has to pre-stage the data again, incurring additional delays and costs.
Note: Spectra Logic strongly discourages configuring a Staged Data Expiration of less than 7 days as any potential cost savings are offset by the possibility of multiple stagings.
12. Using the drop-down menu, select a value for the Default Read Preference. Data is normally read from the source gateway whenever possible. This setting determines when data is read back from the Amazon S3 target, if needed.
Note: Spectra Logic recommends that Default Read Preference be kept at the default of
| Name | Description |
| Last Resort | The source gateway only reads data from the target if the source gateway cannot read from any of its own data partitions. |
| Minimum Latency | The source gateway reads the data from the data partition with the least latency no matter whether it is connected to the source gateway or the target. |
| After Online Pool | l The source gateway only reads data from the target if the source gateway cannot read from an online pool. |
| After Nearline Pool | The source gateway only reads data from the target if the source gateway cannot read from a nearline pool. |
| After Non-Exportable Tape | The source gateway only reads data from the target gateway if the source gateway cannot read from secure media. |
| Never | Data is never read from the target. |
13.Optionally, enter the information for a proxy server:
| Field | Description |
| Proxy Domain | Domain name for the proxy server. |
| Proxy Host | The host name or IP address for the proxy server through which the gateway connects. |
| Proxy Port | The proxy server port through which the gateway connects. |
| Proxy Username | The username used when connecting through the proxy server. |
| Proxy Password | The password used when connecting through the proxy server. |
14.Click Create. The new Amazon S3 target appears on the Replication Targets screen.
Configuring a Microsoft Azure target allows a data policy on the BlackPearl gateway to replicate data to the Microsoft Azure cloud. With replication enabled, as soon as data is PUT to the cache of the source gateway it begins replication to the Microsoft Azure cloud.
Use the instructions in this section to configure a Microsoft Azure target.
1. From the menu bar, select Configuration > Advanced Bucket Management > Replication Targets to display the Replication Targets screen.
2. Select Action > New Microsoft Azure Target. The New Microsoft Azure Target dialog box displays
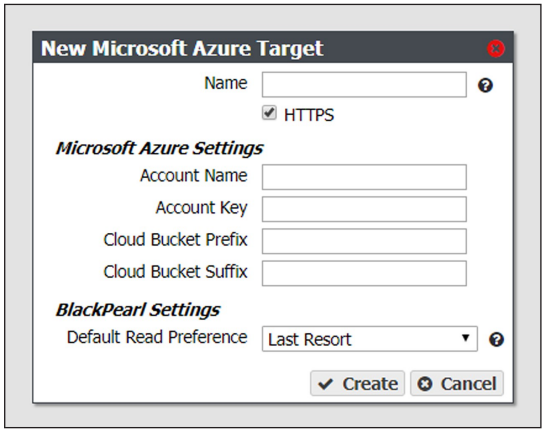
3. Enter a name for the Microsoft Azure target in the Name field.
4. By default, HTTPS is selected so that the replication uses a secure connection. If desired, clear the HTTPS check box to use HTTP.
5. Enter the account name for the Microsoft Azure account in the in the Account Name field.
Note: You can not use the same Account Name for multiple Microsoft Azure targets.
6. In the Account Key field, enter the account key associated with the account entered in Step 5.
7. Optionally, enter a Cloud Bucket Prefix and/or Cloud Bucket Suffix. Bucket names on the BlackPearl gateway must be unique within the gateway, but bucket names in Microsoft Azure must be unique across the world. To permit friendlier, shorter local bucket names on the BlackPearl gateway while avoiding naming conflicts with Microsoft Azure, the gateway adds the defined Cloud Bucket Prefix and Cloud Bucket Suffix to the BlackPearl bucket name when it replicates the bucket. For example, if Cloud Bucket Prefix=prefix, Cloud Bucket Suffix=suffix, and the bucket name=name, the resulting name of the bucket on the Azure target is prefix-name-suffix.
Note: The prefix and/or suffix must adhere to the replication target naming requirements.
8. Using the drop-down menu, select a value for the Default Read Preference. Data is normally read from the source gateway whenever possible. This setting determines when data is read back from the Microsoft Azure target, if needed.
Note: Spectra Logic recommends that Default Read Preference be kept at the default of Last Resort.
| Name | Description |
| Last Resort | The source gateway only reads data from the target if the source gateway cannot read from any of its own data partitions. |
| Minimum Latency | The source gateway reads the data from the data partition with the least latency no matter whether it is connected to the source gateway or the target. |
| After Online Pool | The source gateway only reads data from the target if the source gateway cannot read from an online pool. |
| After Nearline Pool | The source gateway only reads data from the target if the source gateway cannot read from a nearline pool. |
| After Non-Exportable Tape | The source gateway only reads data from the target gateway if the source gateway cannot read from secure media. |
| Never | Data is never read from the target. |
9. Click Create. The new Microsoft Azure target appears on the Replication Targets screen.
¶ Create Storage Domain
A storage domain is a named collection of member data partitions and, when applicable, media type combinations. Storage domains define the possible places where the BlackPearl Nearline Gateway stores data that is sent to it. Data persistence rules and data policies further define where and for how long to store specific data. Entire data partition/media type combinations are members of storage domains. When a bucket requires additional capacity, a single disk partition or tape is allocated out of the members to fulfill the capacity requirement.
Use the instructions in this section to create a new storage domain.
1. From the menu bar, select Configuration > Advanced Bucket Management > Storage & Data Policy Management to display the Advanced Bucket Management screen.
2. Select Action > New Storage Domain. The New Storage Domain dialog box displays.
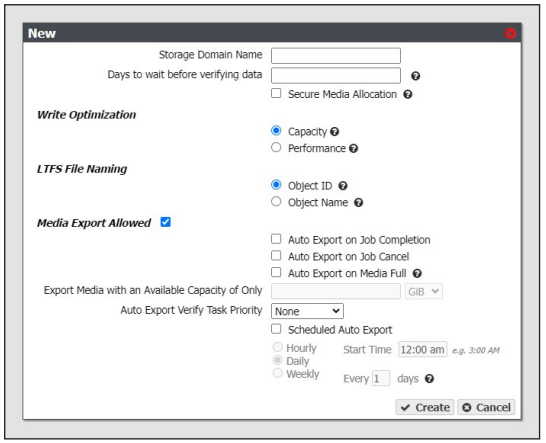
3. Enter a name for the storage domain in the Storage Domain Name field.
4. Enter a value for Days to wait before verifying data. The gateway automatically performs a data integrity verification for all tape media in the storage domain that are unchanged after the specified number of days pass, to ensure the data written to the tape cartridge is still viable. If null, data integrity verification is not performed automatically.
Notes:
- By default, all data on the tape is verified. You can customize the amount of data to be verified in Configure the DS3 Service.
- When this verification completes, the Last Verified field on the tape details screen is updated.
- While the verification is in progress, client access has priority over the data integrity verification.
- You can also initiate data integrity verification for tape media manually. See Data Integrity Verification - Tape Media for more information.
- Disk pools are not subject to automatic data integrity verification. However, you can initiate data integrity verification for disk pools manually.
5. Select or clear Secure Media Allocation. If enabled, Secure Media Allocation ensures that media allocated to the storage domain always remains in the storage domain. Even if all data on the media is deleted, the media will not be reallocated to another storage domain.
Note: Secure Media Allocation should only be enabled when, for compliance purposes, the user must be certain which media ever contained any data for the storage domain (usually, to physically destroy the media once the data is no longer needed), or to force rotating through media when new backups are created and old backups are deleted.
6. Select the Write Optimization for the storage domain. This setting specifies whether job chunks are written as quickly as possible or across as few pieces of media as possible.
- The BlackPearl gateway writes to tape drives based on chunks, with default chunk size of approximately 128 GB, or 2% of the tape media capacity. When there is a queue of jobs, the BlackPearl gateway aggregates smaller jobs or smaller chunks into a size of approximately 128 GB for each tape drive read or write task.
- When running in Capacity mode, the BlackPearl gateway uses as few tape cartridges or disk pools as possible. The gateway only allocates a new tape cartridge or disk pool when capacity is needed.
- When running in Performance mode, the BlackPearl gateway spreads the chunks or aggregations across all available tape drives, or disk pools. The number of tape drives used can be limited by using tape drive reservations.
- The consequence of using performance mode with tape media is that during a restore or GET job, more tape drives and tapes cartridges are required to restore a data set that was initially spread across many tapes. This can drastically reduce overall performance during restores, as the gateway takes longer to get access to the full data set.
Important: Spectra Logic highly recommends working with Spectra Logic Technical Support, or Spectra Professional Services before using Performance mode.
Note: If the storage domain is assigned to a data policy and "Minimize Spanning" is enabled for the data policy, it overrides the capacity mode and performance mode logic for a given job, up to 1 TB in size. Minimize spanning increases the chunk size to 1 TB, and always keeps one chunk on a single tape regardless of write mode. If the job is larger than 1 TB, then multiple chunks are used and the gateway uses the logic for capacity mode vs performance mode, where different chunks may transfer to different tapes.
7. Select the LTFS File Name option for the storage domain.
Note: This setting only applies to tape media. If the storage domain includes tape partition(s), you must specify the LTFS File Name option for the storage domain. This option specifies how the gateway names the file when it writes them to tape.
There are two options for the LTFS File Name:
- Object Name — LTFS file names use the format {bucket name}/{object name}, for example bucket1/video1.mov. Object names must comply with LTFS file naming rules. If the tapes are exported from the BlackPearl gateway and loaded into a non-BlackPearl tape partition, the file names match the object names.
Important: If you select Object Name, you cannot assign this storage domain to a data policy that uses versioning.
Notes:
- The colon character (:) is not allowed in LTFS file names and therefore not allowed in BlackPearl object names.
- The slash character (/) is not allowed in LTFS file names; however, the BlackPearl software can accommodate a slash in the object name and translates it as a directory in the LTFS file system (e.g. directory1/directory2/video1.mov).
- File names with multiple consecutive slash characters (//) are not allowed.
- Directory names have a limit of 255 characters.
- File names have a variable character limit. If you are using English ASCII characters, the limit is 1024 characters. If you are using a graphical language, such as Japanese, the limit is 512 characters
Spectra Logic does not recommend the following characters in LTFS file names or BlackPearl object names for reasons of cross-platform compatibility:
- Asterisk (*)
- Question mark (?)
- Question mark (?)
- Forward slash (/)
- Backslash (\)
- Vertical bar / pipe (|)
- Left curly brace ({)
- Right curly brace (})
- Caret (^)
- Percent character (%)
- Grave accent / back tick (`)
- Right square bracket (])
- Left square bracket ([)
- Double quotation marks (")
- Greater Than symbol (>)
- Less Than symbol (<)
- Tilde (~)
- Pound character (#)
- Control characters such as carriage return (CR) and line feed (LF)
- Non-printable ASCII characters (128–255 decimal characters)
Spectra Logic does not recommend accented characters in LTFS file names or BlackPearl object names because LTFS normalizes them before objects are written to tape and there could be conflicts with two objects having the same normalized name.
- Object ID — LTFS file names use the format {bucket name}/{object id}, for example bucket1/1fc6f09c-dd72-41ea-8043-0491ab8a6d82. Object names do not need to comply with LTFS file naming rules. The gateway saves object names as LTFS extended attributes allowing any third party application to reconstruct all the data including the object names.
Important: If this storage domain is assigned to a data policy that uses versioning, after data is persisted, you cannot change this setting from Object ID to Object Name.
8. Optionally, select the Media Export Allowed check box to enable tape media export options for the storage domain. Clear the check box to disallow tape media export for the storage domain. This setting only applies to tape media. See Tape Export Best Practices on page 24 for more information.
When a tape cartridge export occurs, a message displays in the BlackPearl user interface, and is also emailed to the system administrator. The system administrator must be configured to receive emails with both Informational and Warning message severity to be notified when tape media is exported. This allows the administrator to retrieve the tape media when it is exported. Do not leave tape media in the library Entry/Exit port for long periods of time.
Notes:
- By configuring email alerts, the user is also notified when a GET job is requesting an object from exported tape media, so it can be imported into the library to complete the GET job.
- It is important to not export tape media from the library directly. The BlackPearl Nearline gateway controls the movement of media in the library.
If you select to allow media export, configure the following options:
a. Select or clear options for auto media export.
- Auto Export on Job Completion — select this option to have the gateway automatically export tape(s) when a job completes. This option is helpful if you plan to write a single job to tape and want to retrieve the media shortly after the job completes for secure archival or transfer of data to another tape library or BlackPearl Nearline gateway.
- Auto Export on Job Cancel — select this option to have the gateway automatically export tape(s) when a user cancels a job. This option is helpful if you do not want append the next job to a partially filled tape.
- Auto Export on Media Full — select this option to have the gateway automatically export tape(s) when a tape is full. This option is helpful to maximize the amount of data stored on tape media.
Note: If you select for media to automatically export when the media is full, you can optionally configure the Export Media with an Available Capacity of Only setting, which determines when the gateway marks a piece of media as full, and queues the piece of media for export. Select the desired unit size from the drop‐down menu and enter a numerical value for the media full threshold in the text box to the left of the unit size drop‐down menu.
b. Using the Auto Export Verify Task Priority drop-down menu, select a task priority for tapes to be verified when they are automatically exported. Selecting None means that the gateway does not verify tapes before exporting them.
c. Select or clear the Scheduled Auto Export check box. If enabled, this option automatically exports all tape media on a set schedule. This option is helpful if you need to move all tape media to off-site archival physical storage on a set schedule, regardless of the capacity of storage remaining on the tape cartridges. Use the instructions below to configure either hourly, daily, or weekly, automatic tape export.
Note: Scheduled Auto Export operates independently from the condition-based auto export options discussed in Step a on page 77.
For example, if you select to have tape media auto export when full, the gateway exports a tape cartridge when it meets the media full threshold. Additionally, when the scheduled auto export time is met, the gateway exports all tape cartridges, regardless of whether they have reached the media full threshold.
i. Select Hourly as the interval for the tape export schedule
ii. Enter numbers for Every _ hours on minute _. These values specify the interval in hours between tape exports and the number of minutes after the top of the hour when the export starts. For example, if the values are set to 4 and 15, tapes are exported every four hours at 15 minutes after the hour. The maximum setting for the hours field is 48, where tapes are exported every two days.
Note: Spectra Logic recommends offsetting the minutes after the hour for starting tape exports so that there are not a large number of jobs starting at exactly the same time.
i. Select Daily as the interval for the tape export schedule.
ii. Enter a time value for Start Time, and include AM or PM after the value. This field is not case sensitive.
iii. Enter a number for Every _ days. Allowed values are between 1 and 31. This value specifies the interval, in days, between scheduled exports. The value entered is enumerated from the first day of the month. The schedule resets at the beginning of each month. For example, if this value is set to 2, scheduled tape exports occur every two days, starting with the 1st of the month, at the time specified in Step ii. A value of 30 runs on the 1st of the month, and then again on the 31st of the month (for months that have 31 days). To schedule exports on the first of every month, set the interval to 31 days.
i. Select Weekly as the interval for the tape export schedule (see Figure 14 on page 73).
ii. Enter a time value for Start Time, and include AM or PM after the value. This field is not case sensitive.
iii. Select one or more days for Every week on:. This determines the day(s) of each week the gateway exports tapes.
Once a storage domain is created, you must add storage domain members. Entire data partition/media type combinations are members of storage domains. When a bucket requires additional capacity, a single disk partition or tape cartridge is allocated out of the members to fulfill the capacity requirement.
Use the instructions in this section to add a storage domain member to a storage domain.
1. From the menu bar, select Configuration > Advanced Bucket Management > Storage & Data Policy Management to display the Advanced Bucket Management screen.
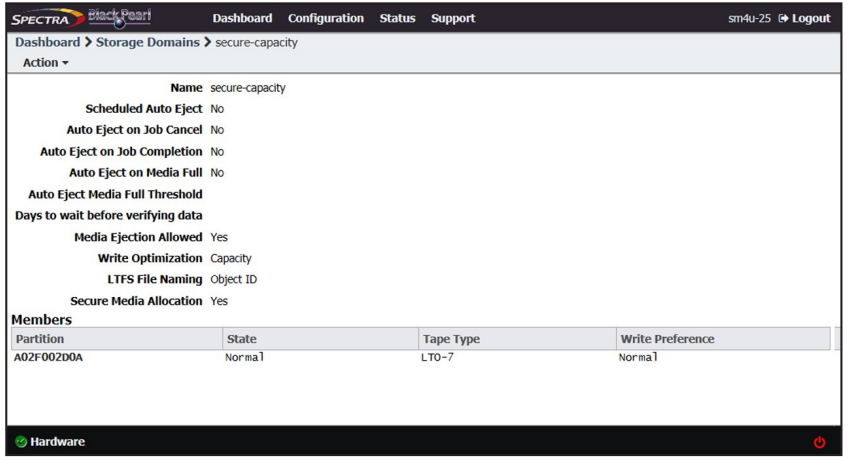
2. Double-click the storage domain for which you want to add a new storage domain member in the Storage Domains pane, or select the storage domain and select Action > Show Details from the menu bar. The Storage Domain details screen displays.
3. Select Action > New Storage Domain Member. The New Storage Domain Member dialog box displays.
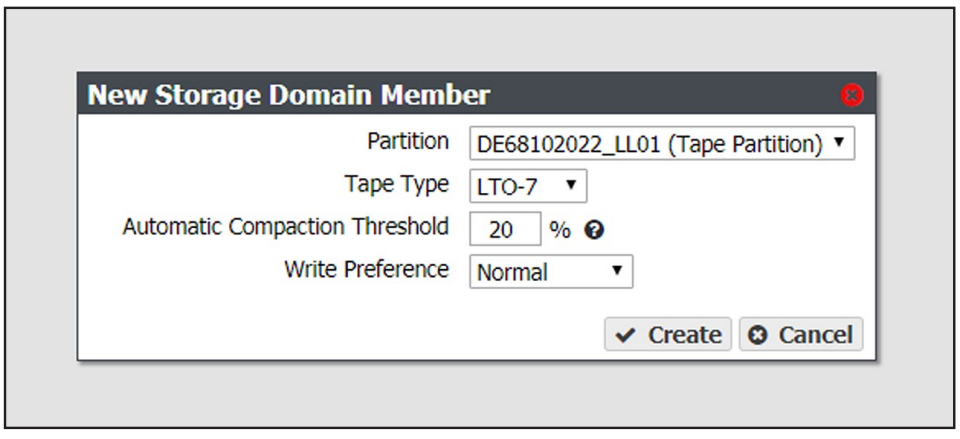
4. Use the Partition Name drop-down menu to select a tape or disk partition from the list of previously created partitions.
Note: You cannot add a disk partition to a storage domain that already uses a tape partition, and you cannot add a tape partition to a storage domain that already uses a disk partition.
5. Use the Tape Type drop-down menu to select the media type for a tape partition.
Notes:
- You must select the media type that matches the media present in the tape library partition. If the partition contains multiple generations of media, select the highest version.
- This option does not display if you selected a disk partition in Step 4
6. Enter a percentage for the Automatic Compaction Threshold. Automatic compaction occurs when the percentage of deleted objects on a tape cartridge exceeds this value. The default percentage is 95.
Note: If you selected a disk partition in Step 4, this setting is unavailable.
7. Use the Write Preference drop-down menu to select the write preference for this member of the storage domain. This setting determines the preferred usage of the partition when additional capacity is needed. The gateway uses a partition with High write preference before a partition with Normal write preference, and so on. Use Never Select to indicate that a partition is read-only.
8. Click Create. The new storage domain member displays on the Storage Domain details screen.
¶ Create Data Policy
A data policy defines data integrity policies, default job attributes, and persistence and replication rules, which define where data is written and for how long it is kept. A data policy may be used by multiple buckets, but a bucket uses precisely one data policy. Use the instructions in this section to create a new data policy.
1. From the menu bar, select Configuration > Advanced Bucket Management > Storage & Data Policy Management to display the Advanced Bucket Management screen.
2. Select Action > New Data Policy. The New Data Policy dialog box displays.
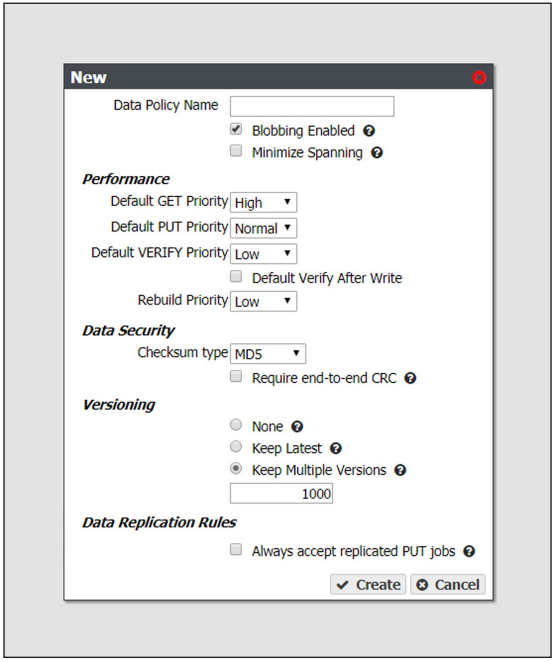
3. Enter a name for the data policy in the Data Policy Name field.
4. Select or clear the Blobbing Enabled check box. When enabled this setting allows an object to be broken into multiple blobs. If disabled, an object must be exactly one blob. Blobbing must be enabled to handle objects larger than 1 TB, to use multi-part upload, or to break up an object into multiple blobs.
Note: Disabling blobbing guarantees that an object will never span multiple tapes or disk pools, since a blob cannot span multiple media.
5. Select or clear the Minimize Spanning check box. When enabled, this setting minimizes the spanning of data across multiple tapes or pools. Jobs less than 1 TB never span media.
Notes:
- When "Minimize Spanning" is enabled, it overrides a storage domain's capacity mode and performance mode logic for a given job, up to 1 TB in size. Minimize spanning increases the chunk size to 1 TB, and always keeps one chunk on a single tape regardless of write mode. If the job is larger than 1 TB, then multiple chunks are used and the gateway uses the logic for capacity mode vs performance mode, where different chunks may transfer to different tapes
- Enabling this option can adversely affect capacity utilization and performance.
6. Select the Performance characteristics for the data policy. Each priority determines the resources assigned and the processing order. Jobs with priority Urgent can use up all of the resources and prevent other jobs from making progress. Use this priority sparingly.
a. Use the drop-down menu to select the Default GET Priority.
b. Use the drop-down menu to select the Default PUT Priority.
c. Use the drop-down menu to select the Default VERIFY Priority.
d. Select or clear Default Verify After Write. Clients may specify whether or not to verify data immediately after writes when creating a PUT job. If the client does not specify a policy for verification of data after writes, this selection determines whether a verify is done. If done, the verification uses the checksum type specified in Step 7.
Notes:
- After the PUT job completes, the tape remains in the drive during data verification.
- Only the data just written by the PUT job is verified.
- This verification does not update the Last Verified field on the tape details screen.
- Selecting Default Verify After Write reduces gateway write throughput by up to 50%.
- This setting does not apply to replication targets.
e. Use the drop-down menu to select the Rebuild Priority.
7. Select the Data Security options for the data policy.
a. Use the drop-down menu to select the Checksum type. This setting specifies the type of checksum used to verify data integrity for data in any bucket using this data policy, and the type of checksum required for end-to-end CRC, if specified.
Notes:
- CRC, MD5, and SHA-512 perform the best for their corresponding cryptographic strengths on the BlackPearl gateway.
- Using SHA-256 and SHA-512 reduces single stream performance and may reduce throughput capabilities of the gateway.
b. If you want to enable end-to-end security for each GET or PUT job, select the Require end-to-end CRC check box.
8. Select the type of Versioning you want to use for the data policy. You must select either None, Keep Latest, or Keep Multiple Versions.
Important: If you select Keep Multiple Versions, you are not able to change this setting after the data policy is created.
- None - Only one version of an object may exist at any time and the version number of the object is always 1.
- Keep Latest - Only one version of the data is available at a time. When a new version of an object is written, the old version is retained until the new version is fully written in compliance with the data policy, and then the old version is deleted.
- Keep Multiple Versions (default) - When a new version of an object is written, it is added as the latest version of the object. Any previous versions of the object, up to the value specified, are retained and accessible. The default value of 1000 is pre-entered.
Notes:
- You cannot assign a Storage Domain configured with the LTFS option set to Object Name when using the Keep Latest or Keep Multiple Versions setting.
- The Keep Latest setting requires that the PUT job for the earlier version of the object complete before the PUT of the latest version of the object with the same name in order for the PUT job to succeed.
Caution: If you select Keep Multiple Versions, if the PUT of the earlier version is not complete before the PUT of the latest version, the BlackPearl gateway believes the latest version to be the same object as the earlier version and rejects it, and only the earlier version is retained.
9. If you plan to configure a data replication target, select or clear the Always accept replicated PUT jobs check box. This option controls whether all PUT jobs for this data policy are created even if one or more replication targets the gateway must PUT to are unavailable, or if there are global issues that would likely prevent the completion of the job.
Note: Using this parameter is discouraged, and using it for jobs on both the source and target gateways at the same time is extremely discouraged. Running jobs on both gateways when they are not able to communicate with each other can create replication conflicts that must be manually resolved.
10.Click Create. The new data policy displays on the Advanced Bucket Management screen
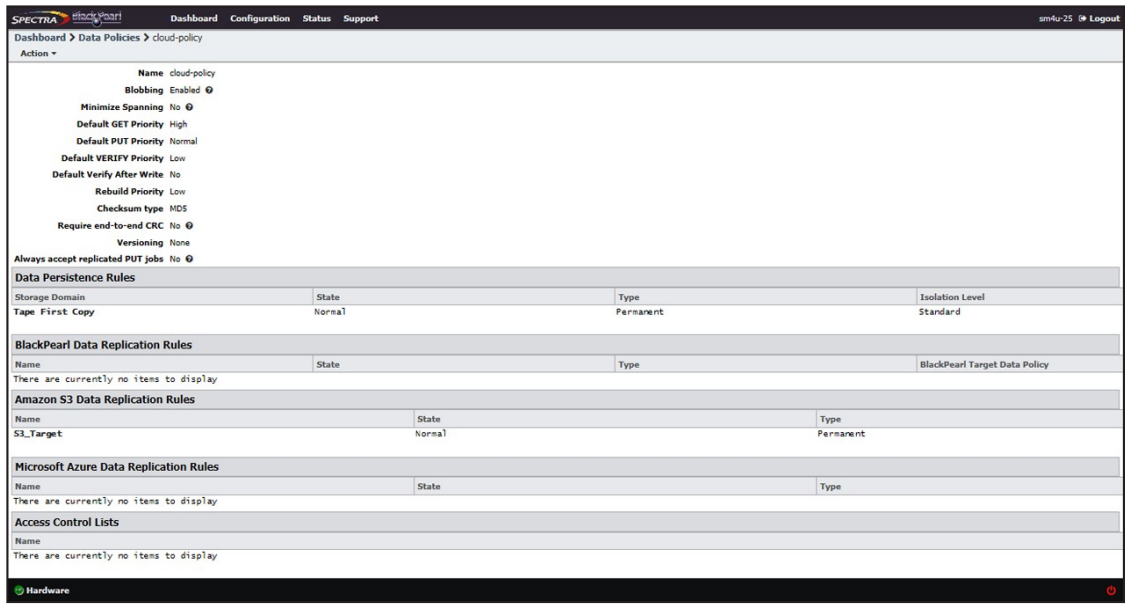
Once a data policy is created, you must add persistence rules. A persistence rule is either permanent, meaning that data is kept in the specified storage domain at all times, or temporary, meaning that data is kept in the specified storage domain under certain circumstances, and then it can be deleted from that storage domain. Existing permanent and temporary persistence rules, and replication rules, may be retired so that the rule is not applied for any new incoming data, but will continue to retain data previously written. A data policy must include at least one permanent persistence rule.
1. If necessary, select Configuration > Advanced Bucket Management > Storage & Data Policy Management to display the Advanced Bucket Management screen.
2. Double-click the data policy in the Data Policies pane, or select the data policy and select Action > Show Details from the menu bar. The Data Policy details screen displays.
3. Select Action > New Data Persistence Rule. The New Data Persistence Rule dialog box displays.
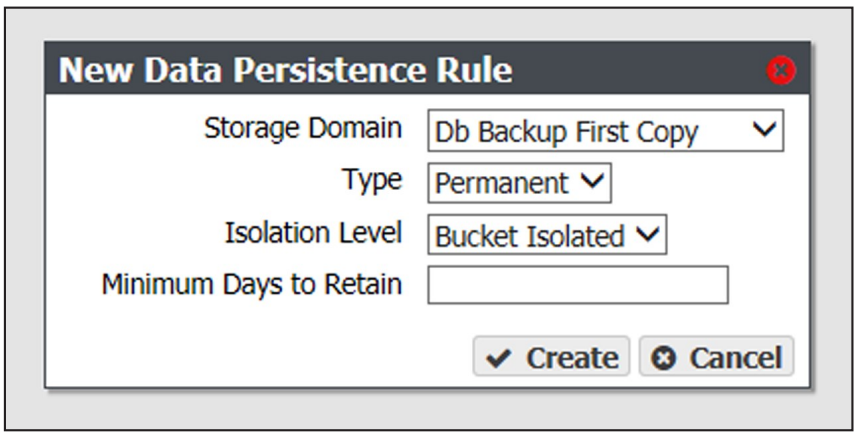
4. Use the Storage Domain drop-down menu to select a storage domain from the list of previously created storage domains.
5. Use the Type drop-down menu to select whether the data persistence rule to use for the for the storage domain is Temporary or Permanent.
- Temporary - The data is kept in the specified storage domain under certain circumstances, and then it can be deleted from that storage domain.
- Permanent - The data is kept in the specified storage domain at all times
Notes:
- The Temporary setting cannot be used for a storage domain that targets a tape library.
- When importing data, a Temporary persistence rule does not trigger copying data to a disk pool unless the data is staged with IOM (Intelligent Object Management) active and running. See Intelligent Object Management (IOM) for information on IOM.
- You cannot create a Data Persistence Rule with a setting of Retired. Existing persistence rules can be modified to be retired.
6. Use the Isolation Level drop-down menu to select the level of physical isolation required for the storage domain.
- Standard — This allows data from different buckets to reside on the same physical media, and may provide increased performance. This setting is recommended data policies configured to use disk storage.
- Bucket Isolated — Data from different buckets cannot be mixed on the same physical storage media.
Notes:
- The Standard isolation level provides the best capacity utilization and overall performance.
- Bucket Isolated allocates an entire disk pool to a bucket when needed. Allocating an entire disk pool to a bucket may use up resources quickly and is not recommended.
7. Enter the Minimum Days to Retain in the entry field to specify the minimum number of days the gateway should retain data written using a temporary persistence rule.
Notes:
- The Minimum Days to Retain for a persistence rule targeting a storage domain using a nearline pool (a 77-bay, 96-bay, or 107-bay expansion node) must be 90 days or greater.
- Minimum Days to Retain cannot be specified when using a Type of Permanent.
8. Click Create. The new data persistence rule displays on the Data Policy details screen.
A BlackPearl replication target must be configured before adding a BlackPearl Data Replication Rule to the data policy.
1. If necessary, select Configuration > Advanced Bucket Management > Storage & Data Policy Management to display the Advanced Bucket Management screen.
2. Double-click the data policy in the Data Policies pane, or select the data policy and select Action > Show Details from the menu bar. The Data Policy details screen displays.
3. Select Action > New BlackPearl Data Replication Rule. The New BlackPearl Data Replication Rule dialog box displays.

4. Use the BlackPearl Target drop-down menu to select a replication target from the list of previously created replication targets.
5. Use the Type drop-down menu to select whether the data persistence rule to use for the for the storage domain is Permanent or Retired.
Note: You cannot create a replication rule as Retired. You can only modify a rule from permanent to retired after the data policy is created.
6. In the BlackPearl Data Policy entry field, enter the name of the data policy on the target BlackPearl gateway to use when creating the bucket for replicated data. Alternatively, you can leave the field blank.
Notes:
- The data policy name is case sensitive.
- If the field is left blank and the BlackPearl target was configured with the setting “Replicated User Default Data Policy” enabled, and Access Control Replication was set to “Users”, the default data policy on the target gateway is used. If no default is set on the target gateway and the target gateway is configured with more than one data policy, the replication fails
7. Select or clear the Replicate Deletes check box. When selected, any time a replicated file is deleted from the source gateway, it is also deleted from the target gateway.
Note: Replicated objects do not immediately delete. Objects are only deleted after running a verify operation on the bucket.
8. Click Create. The new BlackPearl data replication rule displays on the Data Policy details screen.
An Amazon S3 replication target must be configured before adding an Amazon S3 Data Replication Rule to the data policy.
1. If necessary, select Configuration > Advanced Bucket Management > Storage & Data Policy Management to display the Advanced Bucket Management screen.
2. Double-click the data policy in the Data Policies pane, or select the data policy and select Action > Show Details from the menu bar. The Data Policy details screen displays.
3. Select Action > New Amazon S3 Data Replication Rule. The New Amazon S3 Data Persistence Rule dialog box displays.
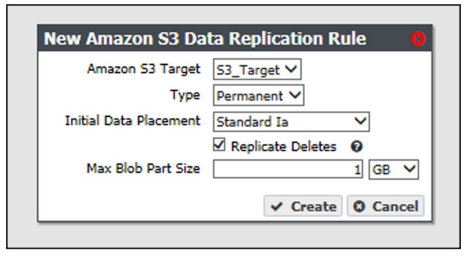
4. Use the Amazon S3 Target drop-down menu to select an Amazon S3 replication target from the list of previously created replication targets.
5. Use the Type drop-down menu to select whether the data persistence rule to use for the for the replication target is Permanent or Retired.
Note: : You cannot create a replication rule as Retired. You can only modify a rule from permanent to retired after creating the replication rule.
6. Use the Initial Data Placement drop-down menu to select the storage class for any objects transferred to the AWS S3 instance. See Storage Classes for detailed descriptions of the storage classes provided by AWS.
Note: The BlackPearl gateway uses "standard" restore for objects archived to Glacier and Glacier Deep Archive storage classes. Restore times are approximately 3-5 hours for Glacier, and 12 hours for Glacier Deep Archive, plus object download time.
- Standard — Provides high availability and performance for frequently accessed data.
- Reduced Redundancy — Provides storage of objects on multiple devices across multiple facilities, but does not replicate objects as many times as Amazon S3 standard storage. The lower level of redundancy results in less durability and availability, but also lower storage costs.
- Standard IA (default) — Provides fast access to less frequently accessed data.
- Glacier — Provides secure, long-term archive for rarely accessed data.
- Glacier Deep Archive — Provides a low-cost, secure long-term archive for data that does not require quick retrieval.
Note: If you are configuring the replication to target a bucket that was previously created using the Amazon AWS interface, you must define a Lifecycle Management Rule in AWS to migrate data from the bucket default tier to the preferred tier, if necessary. Spectra Logic recommends using an immediate (0 days) move rule.
7. Select or clear the Replicate Deletes check box. When selected, any time a replicated file is deleted from the source gateway, it is also deleted from the target.
8. If desired, modify the Max Blob Part Size. This parameter defines the maximum object part size used when sending data to an Amazon S3 target. Larger blob sizes make public cloud workflows simpler, but may make it more difficult or impossible to reliably transmit blobs. Less reliable network connections to the public cloud require smaller blob sizes. The maximum blob size is 1 TB. The default maximum blob size is 1 GB.
Note: To prevent data transfer failures, it is important that this value not exceed the maximum blob size that the target is able to accept.
9. Click Create. The new Amazon S3 replication rule displays on the Data Policy details screen.
A Microsoft Azure replication target must be configured before adding an Microsoft Azure Data Replication Rule to the data policy.
1. If necessary, select Configuration > Advanced Bucket Management > Storage & Data Policy Management to display the Advanced Bucket Management screen.
2. Double-click the data policy in the Data Policies pane, or select the data policy and select Action > Show Details from the menu bar. The Data Policy details screen displays.
3. Select Action > New Microsoft Azure Data Replication Rule. The New Microsoft Azure Data Replication Rule dialog box displays.
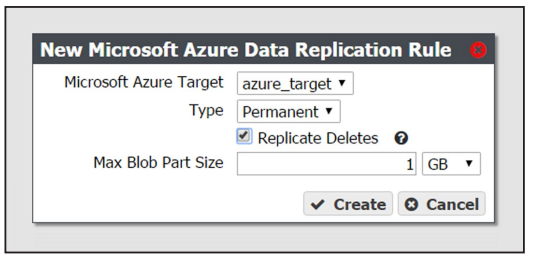
4. Use the Microsoft Azure Target drop-down menu to select a Microsoft Azure replication target from the list of previously created replication targets.
5. Use the Type drop-down menu to select whether the data persistence rule to use for the for the replication target is Permanent or Retired.
Note: You cannot create a replication rule as Retired. You can only modify a rule from permanent to retired after creating the replication rule.
6. Select or clear the Replicate Deletes check box. When selected, any time a replicated file is deleted from the source gateway, it is also deleted from the target.
Note: Replicated objects do not immediately delete. Objects are only deleted after running a verify operation on the bucket.
7. If desired, modify the Max Blob Part Size. This parameter defines the maximum object part size used when sending data to a Microsoft Azure target. Larger blob sizes make public cloud workflows simpler, but may make it more difficult or impossible to reliably transmit blobs. Less reliable network connections to the public cloud require smaller blob sizes. The maximum blob size is 1 TB. The default maximum blob size is 1 GB.
Note: To prevent data transfer failures, it is important that this value not exceed the maximum blob size that the target is able to accept.
8. Click Create. The new Microsoft Azure replication rule displays on the Data Policy details screen.
The sections below describe creating Access Control List (ACL) for both a group of user and an individual user.
¶ New Data Policy ACL for a Group
Use the instruction in this section to create a new data policy ACL for a group.
1. From the menu bar, select Configuration > Advanced Bucket Management > Storage & Data Policy Management to display the Advanced Bucket Management screen.
2. Select the row for the data policy for which you want to create a new ACL for a group, then select Action > Show Details. The Data Policy details screen displays.
3. From the menu bar, select Action > New Data Policy ACL For Group. The New Data Policy ACL For Group dialog box displays.
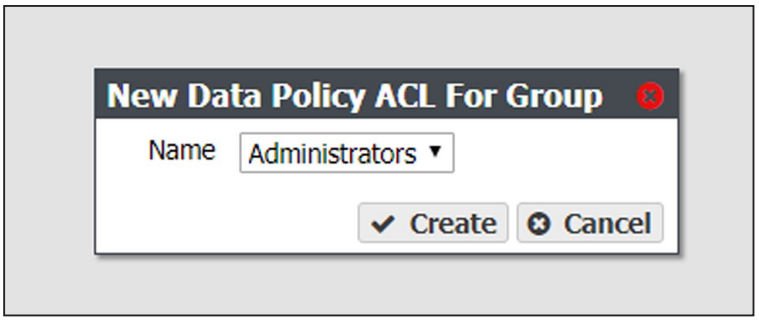
4. Using the Name drop-down menu, select the group to be assigned to the data policy ACL.
5. Click Create.
Use the instruction in this section to create a new data policy ACL for an individual user.
1. From the menu bar, select Configuration > Advanced Bucket Management > Storage & Data Policy Management to display the Advanced Bucket Management screen.
2. Select the row for the data policy for which you want to create a new ACL for a user, then select Action > Show Details. The Data Policy details screen displays.
3. From the menu bar, select Action > New Data Policy ACL For User. The New Data Policy ACL For User dialog box displays.
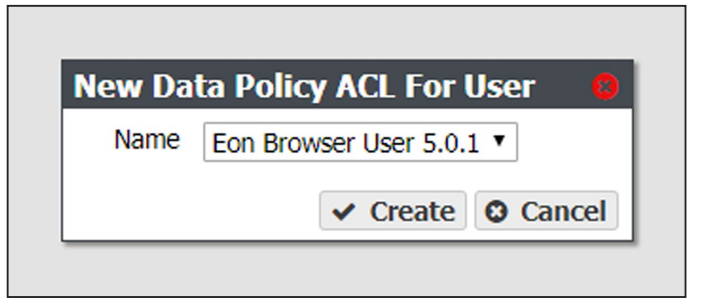
4. Using the Name drop-down menu, select the user to be assigned to the data policy ACL.
5. Click Create.
¶ Create Bucket
Buckets are data transfer targets for read and write operations. The gateway stages data written to it on the cache and optimizes how it writes buckets to storage domains for best performance.
Clients write data to the gateway using a “bulk PUT” command, and read from the gateway with a “bulk GET” command.
Note: Buckets can also be created using a DS3 client, or the DS3 API.
Important: If you are creating a bucket that is used in a BlackPearl replication configuration, you must create the bucket on the source gateway, and the target gateway using identical names, or replication fails.
Use the instructions in this section to configure a bucket.
1. From the menu bar, select Configuration > Buckets. The Buckets screen displays.
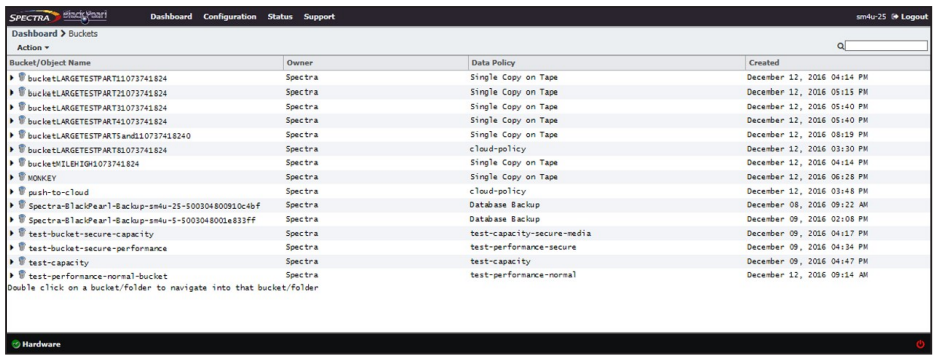
2. Select Action > New from the menu bar. The New Bucket dialog box displays.
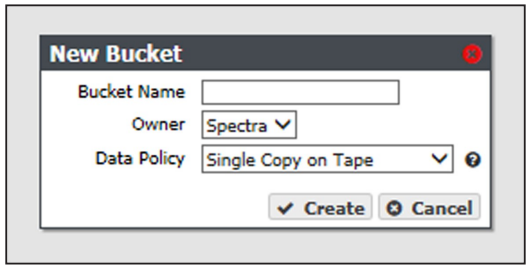
3. Enter a name for the bucket in the Bucket Name field.
When creating a bucket for use with an Amazon S3 or Microsoft Azure replication target, the bucket name must adhere to the cloud target naming requirements. The BlackPearl gateway attempts to create the bucket on the replication target using the name entered in Step 3 with the appended Cloud Bucket Prefix and Suffix, if applicable.
Important:
- For BlackPearl OS 3.5.2 or earlier, the BlackPearl gateway changes bucket names with upper case letters to all lower case letters when needed. If you are using bucket names that only differ by case, the buckets are combined on the cloud target causing possible data collision and bucket ownership/permission problems.
- For BlackPearl OS 4.0 or later, if the bucket name is incompatible with the naming requirements of the cloud target provider, bucket creation fails and an error message displays.
Notes:
- The bucket name cannot contain a colon (:), forward slash (/), or space.
- The bucket name cannot exceed 255 characters.
4. Using the drop-down menu, select an Owner for the bucket from the list of users already created on the gateway.
5. Using the drop-down menu, select a Data Policy for the bucket from the list of previously created data policies on the gateway. The bucket uses this data policy when transferring data.
6. Click Create. The Buckets screen displays with the newly created bucket listed.
Use the instructions in this section to create a new Access Control List (ACL) using the specified group for a bucket.
1. From the menu bar, select Configuration > Buckets. The Buckets screen displays.
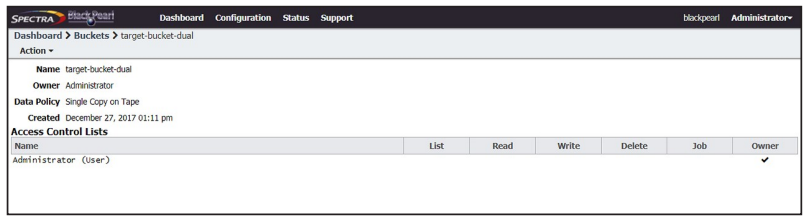
2. Select the bucket for which you want to create an ACL and select Action > Show Details. The bucket details screen displays.
3. Select Action > New Bucket ACL For Group. The New Bucket ACL For Group dialog box displays.
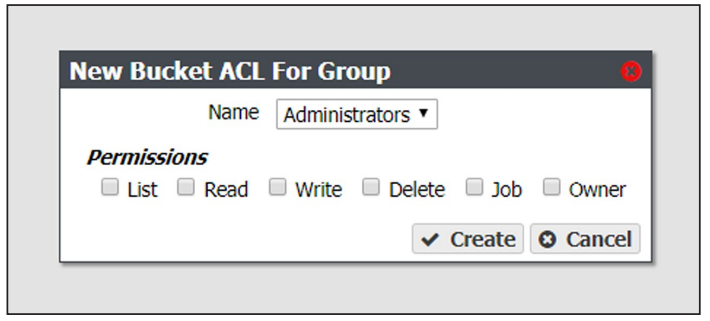
4. Using the Name drop-down list, select a group from the list of exiting Amazon compatible S3 groups on the BlackPearl gateway.
5. Select the desired Permissions for the group ACL.
- LIST — The users in the group can see the bucket in a get buckets request and can list the objects in a bucket. The users can also perform any type of bucket or object get that does not involve returning the actual data for an object.
- READ — The users can get objects and create GET jobs.
- WRITE — The users can put objects and create PUT jobs.
- DELETE — The users can delete objects, but cannot delete the bucket.
- JOB — The group members can modify or cancel jobs that they did not create. The users can also see the details of jobs they did not create. Note that all users can view all jobs, but by default, only the initiator of the job can see the full details of a job.
- OWNER — The users receives full access to the bucket, including all permissions listed above, and also receives permission to modify bucket ACLs for that bucket.
6. Click Create.
Use the instructions in this section to create a new Access Control List (ACL) using the specified user for a bucket.
1. From the menu bar, select Configuration > Buckets. The Buckets screen displays.
2. Select the bucket for which you want to create an ACL and select Action > Show Details. The bucket details screen displays.
3. Select Action > New Bucket ACL For User. The New Bucket ACL For User dialog box displays.

4. Using the Name drop-down list, select a user from the list of exiting users on the BlackPearl gateway.
5. Select the desired Permissions for the user ACL
- LIST — The user can see the bucket in a get buckets request and can list the objects in a bucket. The user can also perform any type of bucket or object get that does not involve returning the actual data for an object.
- READ — The user can get objects and create GET jobs.
- WRITE — The user can put objects and create PUT jobs.
- DELETE — The user can delete objects, but cannot delete the bucket.
- JOB — The user can modify or cancel jobs that they did not create. The user can also see the details of jobs they did not create. Note that all users can view all jobs, but by default, only the initiator of the job can see the full details of a job.
- OWNER — The user receives full access to the bucket, including all permissions listed above, and also receives permission to modify bucket ACLs for that bucket.
6. Click Create.